OAuth2 Authentication
The form field allows you to log into an Oauth2 authentication provider system selected in configuration by clicking a button displayed as a part of the form field in question. After clicking the button the form field displays a new window with the provider's website that allows you to log in and authenticate WEBCON BPS to use provider's API data. Once the process is completed, the form field informs the user about successful logging, the log-in button becomes locked, and the tooltip provides information on the token expiration time.
Advanced configuration
To access additional configuration options, click the Advanced configuration button available in the bottom, right corner of the form field configuration window.
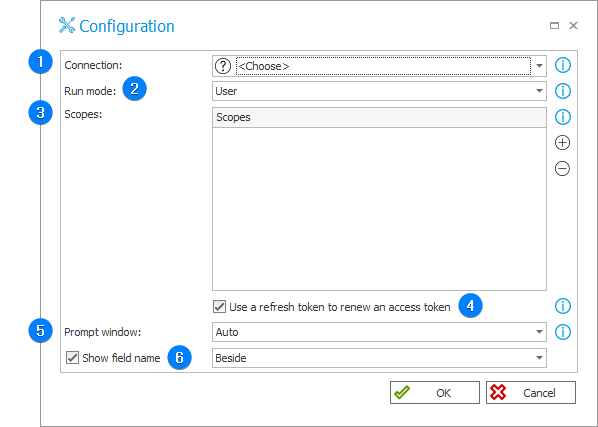
1. Connection
Choose the connection to which the form field is related. It can be one of the REST connections where the OAuth2 User → API authentication type is selected. The form field will trigger the user authentication flow according to the settings entered for this connection.
The access token obtained in this flow is used in actions and data sources related to the same REST connection.
2. Run mode
The drop-down list allows you to select one of the three available operation modes:
- User – in this mode, the form field displays a control that allows the user to log into the configured authentication provider and shows the user the appropriate status after logging in. In this mode, operation from the level of Form Rules (or JavaScript) is limited – it is possible to trigger the authentication flow with the Authenticate rule, but it is not possible to retrieve an access token, obtained in this process from the JavaScript code.
- JavaScript – the control for the form field is not displayed. However, all form rules (and JavaScript) work, including the GetToken rule which allows you to programmatically retrieve an access token issued during user authentication.
- User + JavaScript – the mode combines the two modes mentioned above. All functionalities of both modes are available.
3. Scopes
The list of scopes, set in the form field configuration, overrides the scopes defined in the authentication configuration (the lists are not merged in any way).
When defining the list of scopes, enter all scopes required for proper operation in REST actions or REST data sources. If you are running several REST actions that require different scopes, but operate on the same connection, you must specify the sum of these scopes in the form field configuration. If the authentication on the selected REST connection is defined based on a template, then additional scopes are added to the configured list during authentication. For the Google Identity template: profile, email, openid. For Microsoft identity platform template: profile, email. openid, User.Read.
4. Use a refresh token to renew an access token
Access tokens have expiration time. After expiration, users have to sign into the external identity provider again. A refresh token allows WEBCON BPS to obtain new access tokens without user interaction. To obtain a token, WEBCON BPS sends an additional query access_type parameter with the offline value.
5. Prompt window
The setting affects the value of the prompt parameter which is sent with user authentication request to the authorization address of the identity provider. The behavior of the confirmation window depends on the implementation of this functionality by the identity provider. Some identity providers may not support all possible settings, but only a subset of them. The value of the prompt parameter in each mode:
- Auto – empty value is sent
- Consent screen – "consent"
- Account selection screen – "select_account"
- Consent + Account selection – "consent select_account"
6. Show field name
Selecting the checkbox activates the drop-down list located next to it. Using the list you can define the location of the form field name, i.e. Beside or Above.