Automations
To access automations, select relevant workflow from the available tree and click the Global actions tab in the newly opened window. In the Actions list field, select the item under which an automation will be run and click the plus button on the right. A configurable automation is created with its icon displayed in the Actions list field.
The automation window includes two tabs: General and Error handling:
General
The tab from which automations are added and configured.

1. Add/Delete
Adding and deleting automations under the selected triggering type. For the Menu button and On start (cyclical) triggers, there are additional icons created: New button and New cycle, respectively. Clicking the plus button with the Attachments menu item selected results in adding an action.
2. Basic parameters
The fields allow you to identify automation. The ID field is uneditable, while the Name field is required and cannot be left empty. The Documentation field is optional – here you can enter a description of an automation for an additional explanation of its functions.
3. Automation definition area
The definition field consists of uneditable Start and End blocks connected with an arrow.
To add actions executed under an automation, move the cursor over the arrow. A plus icon appears – click it to open the action selection window.

The action selection window has four tabs:
Operators
The tab includes the following operators:
- Condition – controls the automation workflow in the same way as the workflow control step. Each condition block includes a Boolean rule directing the automation to one of the two paths. It is possible to embed a bigger number of condition blocks to get more branches. Two new operators are available in the block: End and Break with error which allow you to conclude automation earlier. The latter simulates an error. All the events created within the automation are undone, and the automation is run in the Error handling tab.
- For each – allows you to configure an action, operation, or automation for each element from the provided collection. The operator can iterate elements from a collection that can be an item list, any data source, a list of attachments added to a workflow element, and any business rule collection.
- SWITCH - allows more outcomes and conditions to be handled, when compared to the Condition operator.
The condition within the SWITCH operator is a business rule, whose result will point to the case that will be used. The case can be designated in two ways:
Variable referencing the case
As with the Workflow control step, the result of the rule can be a variable that references one of the available cases. If the rule does not identify any case, the ELSE case will be used.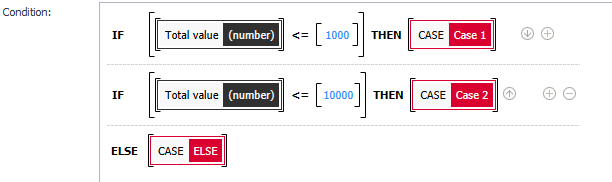
Value assigned to case
Each case may be associated with a value. The result of the condition will be compared with these values (from left to right). If a match is found, the matching case will be used. If the result doesn’t match any case, the ELSE case will be used.
Any number of cases may be created, their names and order may be changed. The ELSE case is always at the end. The operator must have at least 2 cases (including the ELSE case). The SWITCH operator may be changed to the Vertical layout from the context menu.
More information on the For each operator and its configuration is available in the ARTICLE on our technical blog.
Action
The tab includes a set of actions that can be used in the automation. The actions are executed top-to-bottom until the automation encounters the End or Break with error block. The set of actions available in the automation depends on the type of trigger selected in the Action list field. A list of all actions is available here.
Action templates
The tab includes user-created action templates.
Automations
Model automations created within the process that can be embedded in automations under action triggers.
Note that the content of each of the above-mentioned tabs depends on the type of trigger under which the automation is created.
Clicking one of the items creates an action block with a vertical ellipsis icon. Clicking this icon opens a menu with further edition options.
Automation can also be defined in a separate edition window opened with the Edit button on the right side of the automation definition area (ellipsis icon). It includes two tabs: General and Error handling and a rule editor on the right. In the left lower corner there is also a Create process automation button. It can be used to save the created automation and use it in many other locations.
4. Diagram size controllers
Used to increase and decrease the diagram or to restore its default size.
5. Execution time limit
The parameter allows you to determine the automation execution time (expressed in seconds). When the time is exceeded, the automation is stopped and an error "Execution time exceeded" is displayed. Counting the automation time begins with the commencement of its execution and is checked before entering each automation block (action block or process automation block).
For automations run for On timeout and Cyclical events, the time is additionally controlled by the parameter Services operations timeout in seconds set in System settings in the Services window.
If execution time exceeds the time configured at the service level, the automation is immediately stopped. In such cases the error handling automation is not run.
Error handling
The tab allows you to access the error handling function.
The error handling is an automation workflow run in three situations:
- an error occurred while attempting to trigger an action in the main workflow in the General tab,
- the main workflow in the General tab encountered the Break with error block,
- time for automation set in the right lower corner was exceeded, triggering the "Execution time exceeded" error.
In each situation, the actions from the main workflow in the General tab are undone and the "Error handling" workflow is run. The Error handling tab allows you to configure an alternative automation that helps WEBCON BPS to undo changes in the external systems. For this reason, the tab offers much fewer actions irrespective of the triggering type.
The tab includes only the Definition field whose layout corresponds to the same field in the General tab. It allows the user to create an automation diagram.