Getting started
Installation and basic configuration
The installation of WEBCON BPS is carried out via an intuitive wizard that will guide you through all its steps and inform about any errors and parameters that need to be completed.
Before proceeding with the Standalone installation, read the requirements for your software, hardware, Windows and SQL Server accounts provided in the Installation guide (see the downloaded WEBCON BPS installation package).
Installation includes the following steps:
1. Selecting the installation mode – select a new WEBCON BPS installation and Standalone environment.
2. System and privilege verification – the installer checks all the components required for the installation and verifies account privileges.
3. Selecting components – in this step, a preview of the installed WEBCON BPS components is available. It is possible to skip the installation of some system components.
4. Installing components – a summary of components to be installed. It is possible to specify the installation folders here.
5. Creating and configuring SQL databases – specify the SQL server connection parameters, the parameters for creating databases, configuration database, attachment and archive databases, as well as configuration database connection settings.
6. WEBCON BPS Portal installation – in this step you need to create an additional application on the IIS server and configure the Portal address.
7. Configuring administrator account – define a password for the built-in administrator account.
8. Configuring WEBCON BPS Workflow Service – enter the credentials of a domain user and select the role supported by the installed service.
9. Lunching WEBCON BPS Workflow Service – the service is not launched automatically after installation. This step allows you to run it manually.
10. Installing and configuring the Search Server component – specify the protocol, host address and port on which the Search Server service will run.
The installation guide is also available in the form of the instructional video “How to install WEBCON BPS”**:
Creating the first application
This section contains a short instruction on how to create a simple application using WEBCON BPS Designer Studio.
Application and process name
-
Launch WEBCON BPS Designer Studio. Select New → New application from the menu on the left.
-
In the window that appears, enter basic information about the application, as well as the automatically created: process, workflow, and form. Save the operation.
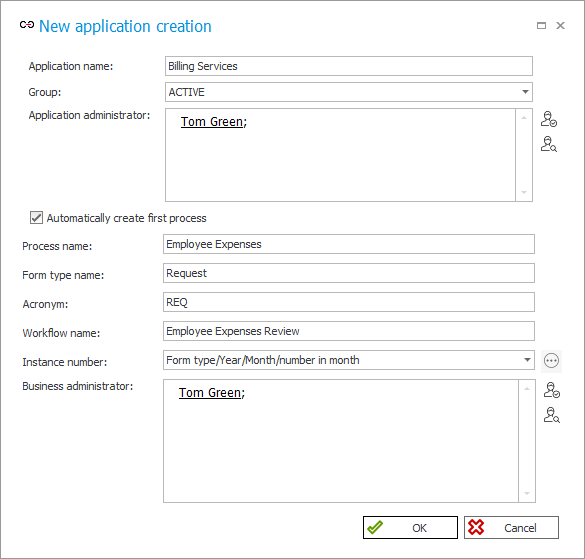
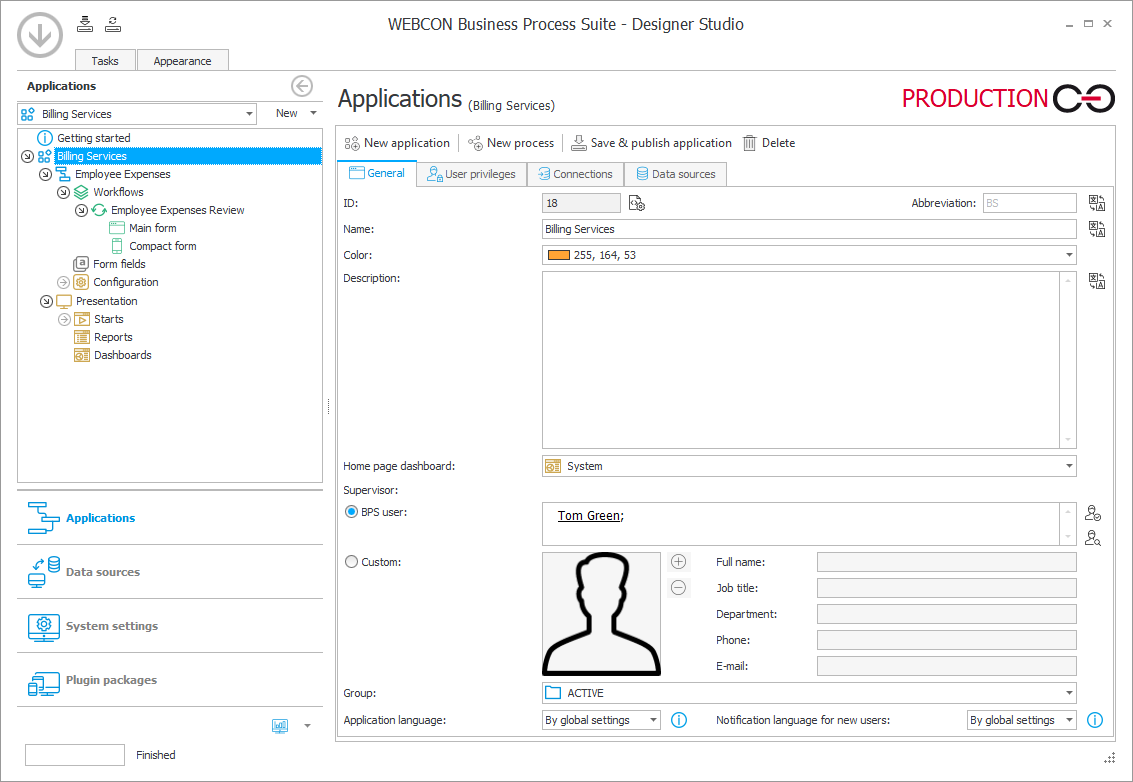
By default, a newly created application has one process, one workflow, one default form, and a data presentation section.
Workflow configuration
-
Click on the created workflow (element of the application tree whose icon depicts two green arrows), and then go to the WorkFlow designer tab. Add steps and paths of the workflow by dragging and dropping them in the desired location of the diagram. Be sure to add names for all elements.
tipSteps are the intermediate stages of the workflow where the workflow instance waits for a task to be completed, while paths are the directions the workflow instance takes to reach the final step (complete all tasks).
The user with the assigned task decides which path and step the workflow instance will go to.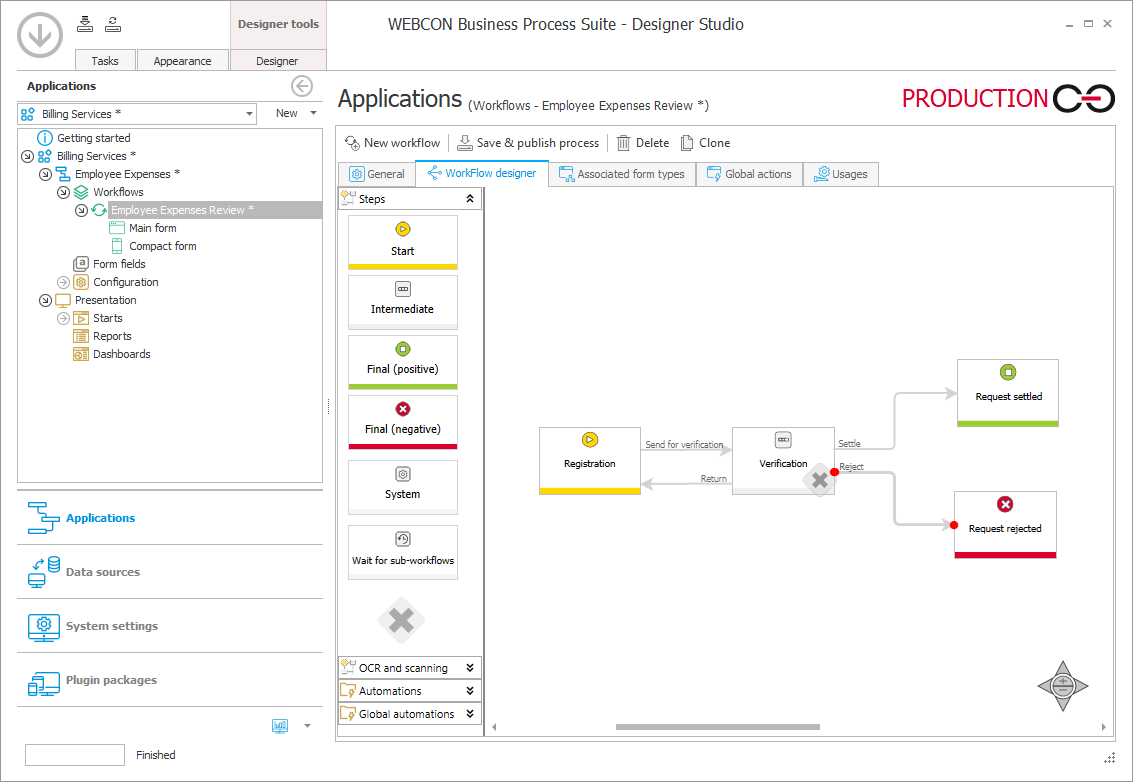
-
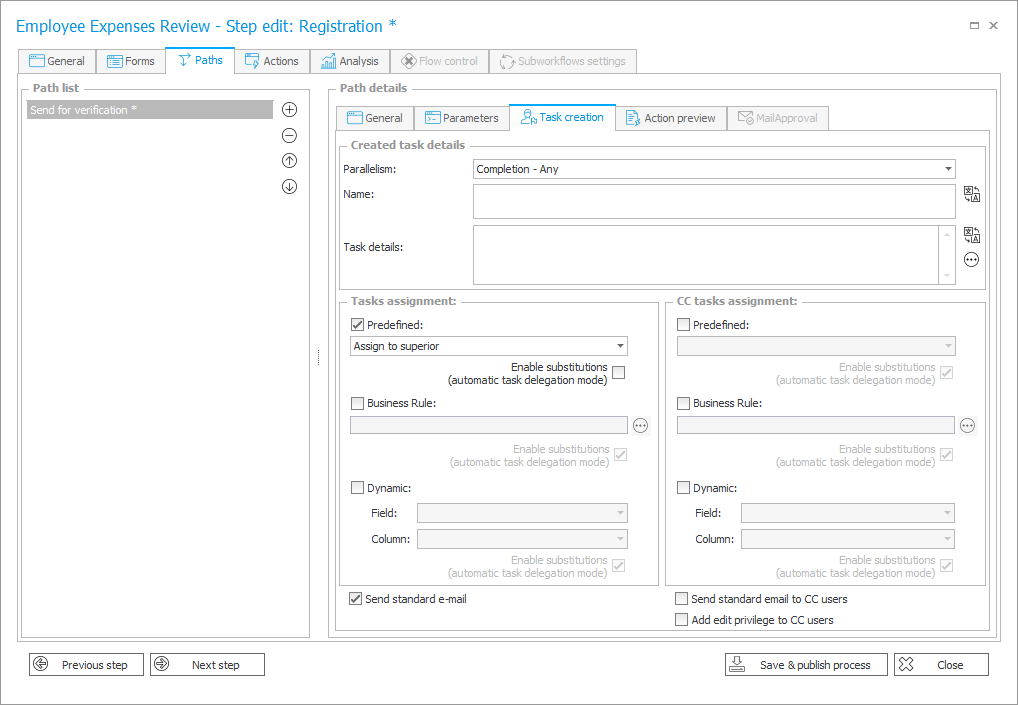
Task assignment is done on the paths. Double-click on the selected path and go to the Task creation tab. In the Task assignment section, check the Predefined box, then select Assign to superior from the drop-down menu.
Do the same for all paths except those leading to the final steps. Remember to assign each task to the right person (author, superior, current user, etc.).
Save the changes by clicking Save & publish process.tipYou can also select the option Send standard e-mail – then the person to whom the task has been assigned will receive an appropriate notification in their mailbox.
Form configuration
-
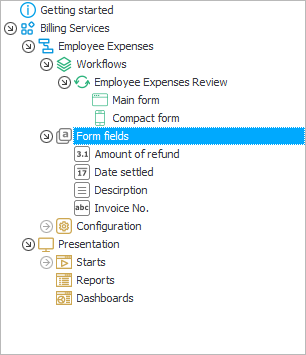
Go to the Form fields node, then click New form field. The default form field type is Single line of text – leave this value unchanged and enter the name of this newly created element.
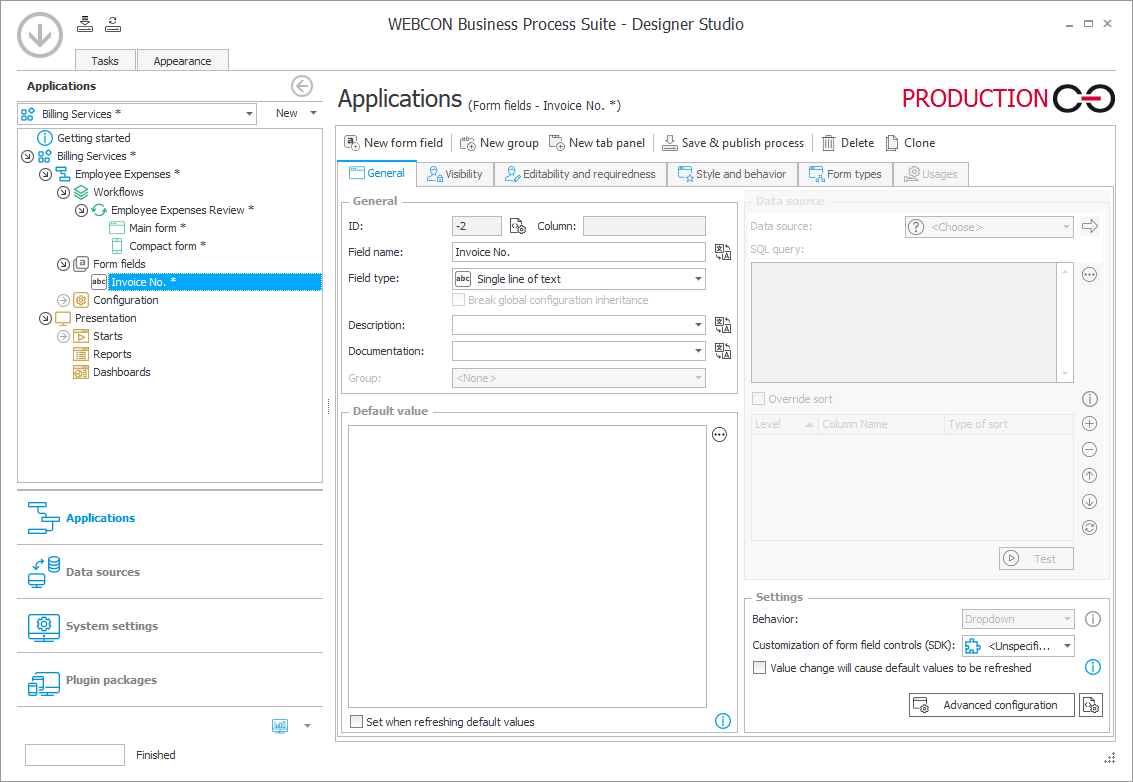
-
Add additional attributes depending on what fields you want to include in your form by selecting the appropriate form field type from the drop-down list. You can also group them.
In the given example, the following form fields have been added:
- "Invoice No." – single line of text,
- "Description" – multiple lines of text,
- "Amount of refund" – floating point number,
- "Date settled" – date and time.
-
Define the order in which the form fields will be displayed on the form by dragging and dropping them to the appropriate place in the Global form template tab (Main form node).
-
Specify which fields will be visible/read-only/required at a given workflow step by going to the Field matrix tab. Do this for the fields on all form panels.
Here you can also change the order of steps by dragging them to the desired place according to the workflow logic.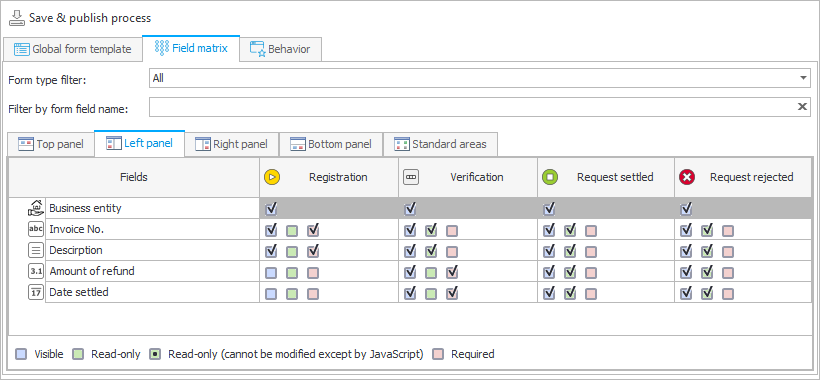
Przycisk Startu
-
Add a button to start the workflow, i.e. to open the designed form in the "Registration" step.
To do this, select Starts → New in the Presentation section and go to the Configuration tab. Fill in the required fields and indicate the application, process, workflow and form for which the button will be created. Save and publish the process.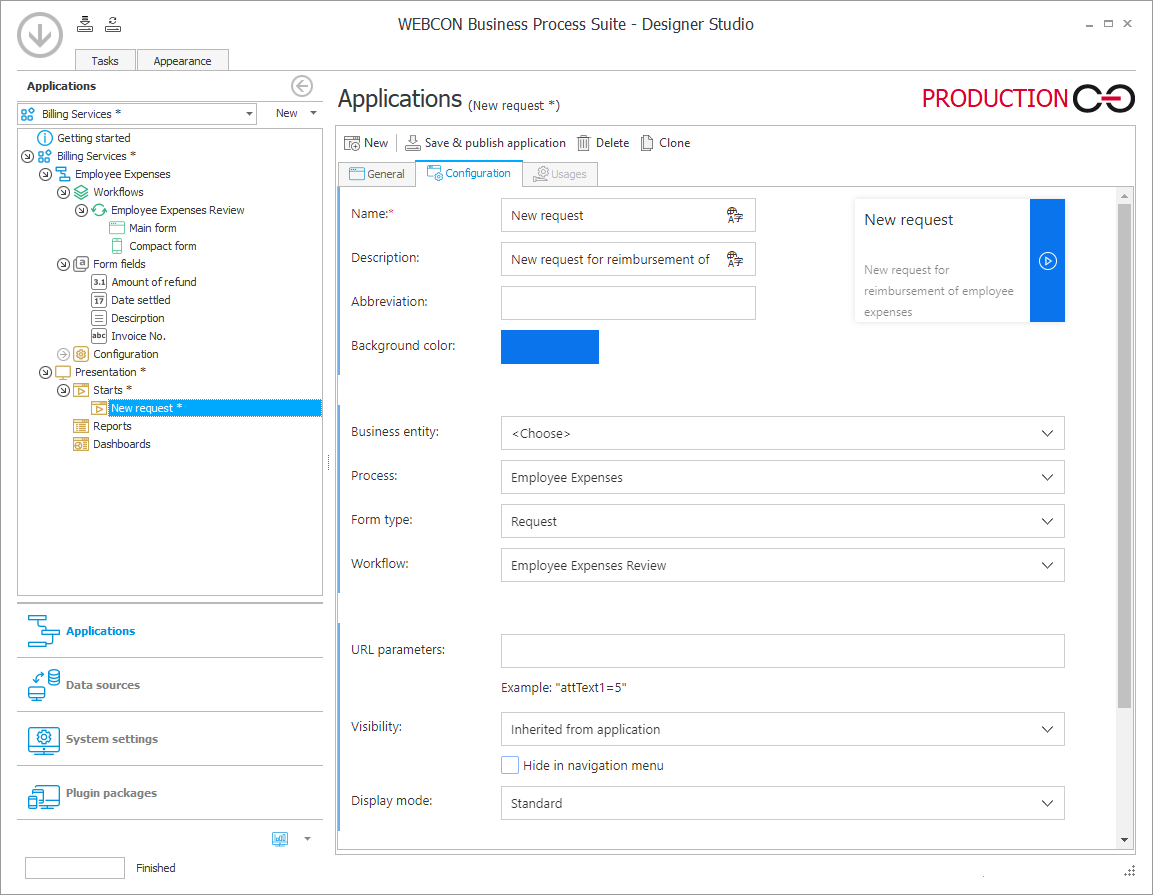
Raport
When creating an application, it is a good idea to configure at least one report. It is an automatically updated list of tasks performed in the application, containing selected information about workflow instances.
-
Go to the Reports node in the Presentation section and select Add → Table. Add the name of the report and indicate the supported Form type and Workflow in the Configuration tab. In this case, these may be the default settings.
-
Open the Columns tab and, from the list on the right, select those process fields (created by the user) or system fields (default) that will constitute the columns of the report – drag and drop them to the appropriate place in the list of columns. Save your changes.
Privileges
The last key element is defining privileges: specify which users will be able to start the workflow, perform a task, or manage the application and make changes to it.
- Click on the application name in the tree and go to the Privileges tab. In the Application privileges section, enter the names of each employee or group. Similarly, grant privileges to Start new workflow instance from the process level.
Application preview
Your application is now ready to use. Open it by right-clicking on the workflow name and selecting Start workflow in process. Alternatively, open WEBCON BPS Portal in your browser and search for the created application.
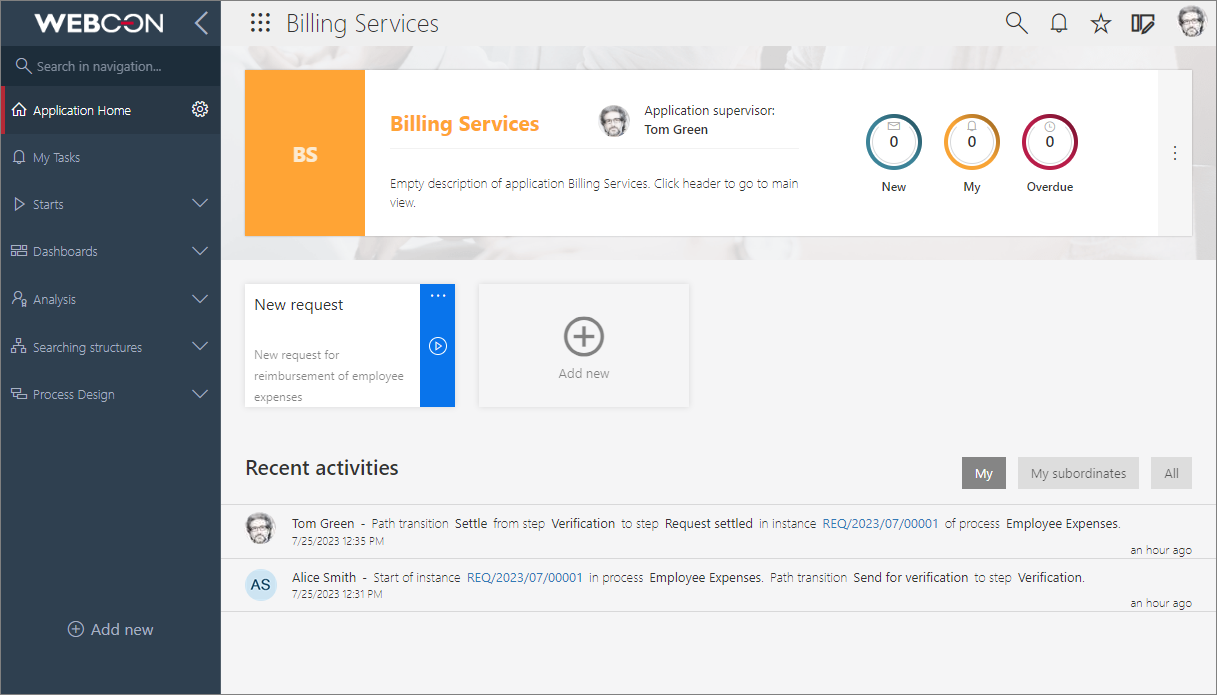
When the workflow instance goes through the entire designed workflow and all users perform their tasks, the application home may look like this:
The guide for creating and running the application is also available in the form of a short video tutorial:
What’s next?
WEBCON BPS offers functionalities allowing to create advanced applications and business processes.
Below are chapter suggestions to help you develop your work tool so that you can get the most out of it.