Global form template
The form template allows you to specify location of form fields on the form. A newly added form fields are placed in the left form panel below the already existing ones.
To change the sequence of form fields or move them between the right, left or bottom panel, left-click and hold a form field and drag it to the desired location. You preview the configured form in your Internet browser by pressing the Form preview button.
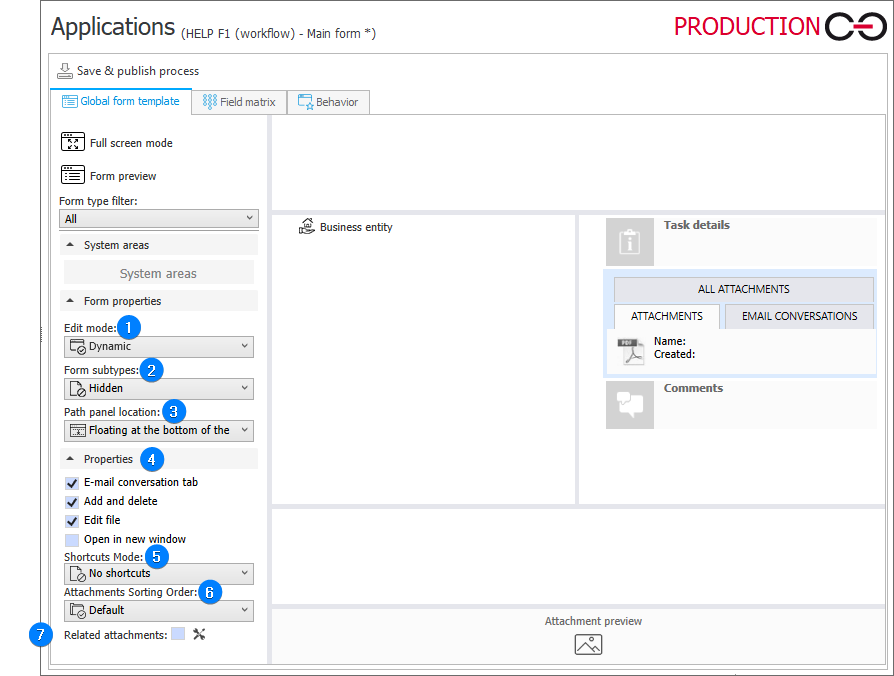
1. Edit mode
The drop-down list allows you to set the edit mode of the form:
- Dynamic – once you go to the form, the instance automatically enters the edit mode if you have an assigned task,
- Default view – after opening the form, the Read-only mode is set for all the users,
- Default edit – after opening the form, the instance automatically enters the edit mode unless the user holds edition privileges.
2. Form subtypes
The drop-down list allows you to set the display mode for the Form subtype choice field. The available options include:
- Hidden – the Form subtype field is not displayed in the form,
- Read-only – the Form subtype field is displayed in the read-only mode,
- Optional – you can edit the value of the displayed Form subtype field,
- Required – you must specify the value in the Document subtype field (had it not been set yet).
3. Path panel location
There are two available locations of path panel:
- Floating at the bottom of the screen (default setting),
- Anchored to the bottom of the form.
4. Properties
The menu available on the right side of the window is displayed after clicking the attachments section.
E-mail conversion tab
When selected, the E-mail conversation tab is visible on the form.
Add and delete
When selected, it adds buttons to the attachments menu that allow users to add or delete attachments.
Edit file
Enables edition of an attachment file.
Open in new window
When selected, it adds a button to the attachments menu that allows users to view an attachment in a new window.
5. Shortcuts mode
The drop-down list enables displaying icons next to attachments. The icons allow you to manage attachments (e.g., Download). There are two available options: No shortcuts or Icons.
6. Attachments sorting order
With the drop-down list, you can specify how the added attachments are to be sorted. The following options are available:
- By default,
- By name,
- By description,
- By insert date ascending,
- By insert date descending.
7. Related attachments
It enables displaying attachments from related instances, including superior and subordinate ones. Additionally, it allows you to display attachments from up to three folders based on an SQL query (up to five folders in total).
By clicking the configuration icon (depicted as crossed wrench and screwdriver), you can configure how the folders are displayed, their names, and content. It is possible to enter any name for the folders. If a checkbox which activates a specific folder is ticked, that folder will appear in ALL ATTACHMENTS tab on the form.
Available options:
- Show attachments from parent workflows – once checked, only attachments belonging to parent workflows (with respect to the current one) are displayed. You can configure the tab name,
- Show attachments from child workflows – once checked, only attachments from subordinate workflows (with respect to the current one) are displayed. You can configure the tab name,
- Show attachments based on SQL query – the field allows you to configure the group name, the attachment source, and the query based on which attachments are displayed.
For the data source configuration, the following columns are available for the data source:
ATT_ID* – attachment ID,
ElementName – description of an instance to which the attachment belongs (instance number by default),
Category – description of the attachment category (attachment category name by default).
::: note Example
select top 5 ATT_ID from WFDataAttachmets order by 1 desc
:::