Generate an Excel file
The action is used for generating a new .xlsx file or modifying an existing file added as an attachment. The core feature of this action and its complementary action Read data from an Excel file is to assign (map) specific process form fields to cell addresses in an Excel spreadsheet.
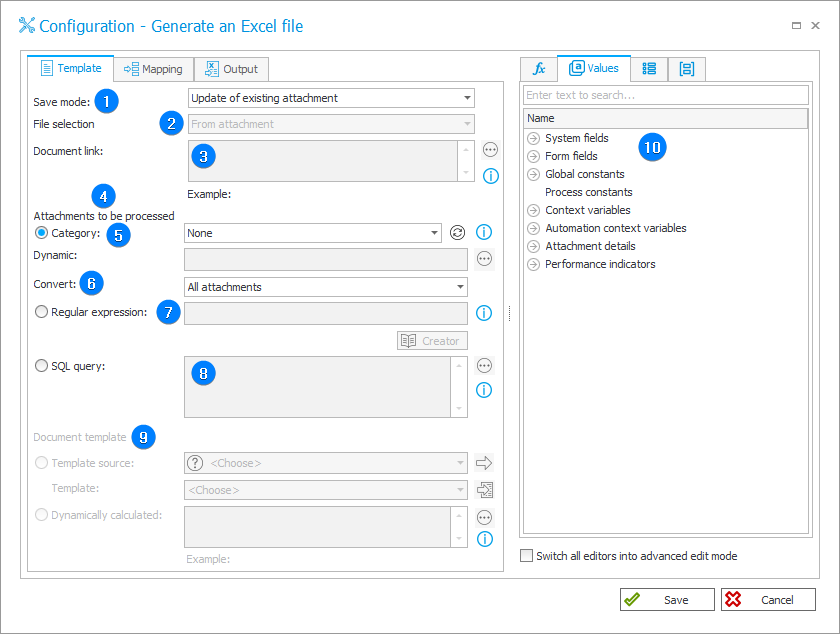
The action configuration window has three tabs: Template, Mapping, and Output.
Template
The tab allows you to configure the basic parameters of the generated document.

1. Save mode
The field allows you to determine whether the action will result in the creation of a new file or update of an existing file.
2. File selection
The field allows you to indicate a place from which the template will be downloaded. Three options are available here:
- From URL – any link allowing to download a document with anonymous access, e.g. http://intranet/workflow/documents/template.xlsx,
- From attachment – an existing attachment is selected as a template in which changes are made,
- From document templates process – a template is specified by means of an ID of a document located in the document templates process. An ID is a value in the following format: /DOCTEMP/GUID/filename, where:
- DOCTEMP – a fixed name specifying document templates process,
- GUID – a template ID from an ID field available in the process form,
- filename – an optional file name.
3. Document link
If the From URL option is selected in the File selection field, provide address of a template to be used.
4. Attachments to be processed
If the option Update existing file is selected as the Save mode or the option From attachment is selected in the File selection field, indicate the attachments to be processed.
5. Category
The field allows you to specify the category of the selected Excel files:
- All – all MS Excel files attached to the workflow instance are selected,
- Dynamic – the category can be created dynamically (using Variables editor) or typed in manually. The category should have the following format: ID#Name or ID,
- None – files not assigned to any category are selected.
6. Convert
The field allows you to specify which attachments will be converted to the .xlsx format.
7. Regular expression
Search for files to convert based on a regular expression. When creating such an expression, you can use the Creator tool run with a separate button available below this field.
To select right attachments, the regular expression usually needs to follow one of the general formulas presented below:
File1 or File2, example: (criterion1|criterion2)
File1 and not File2, example: ^(criterion1|(?!criterion2))
-
Simple selection of files only with a specific extension, e.g. “.pdf”:
.pdf
Correct expression: Attachment1_File.pdf
Incorrect expression: Attachment1_File.docx -
All .docx and .pdf files. The extension is checked and the name is skipped:
^.*(docx|DOCX|pdf|PDF)$
Correct expression: Attachment1_FileName007.docx
Incorrect expression: Attachment1_FileName007.txt -
The file name starts with a clearly defined word (here: WEBCON) followed by the
__or-symbol, any number of alphanumeric characters, and ends with .docx or .pdf extension:
WEBCON(_|-)[a-zA-Z0-9]*\.(docx|pdf)$
Correct expressions: WEBCON_FileName007.docx; WEBCON-FileName007.pdf
Incorrect expressions: WEBCON FileName with spaces.pdf; SharePoint_FileName123.pdf -
The file name starts with a date with the following format: “YYYY-MM-DD”, followed by the
__or-symbol, any number of alphanumeric characters, and ends with .docx or .pdf extension:
^\d{4}\-(0?[1-9]|1[012])\-(0?[1-9]|[12][0-9]|3[01])(_|-).*\.(docx|pdf)$
Correct expressions: 2015-07-09_FileName007.docx; 2015-07-09-File123_New.pdf
Incorrect expressions: 2015/07/09-NotGonnaWork.docx; WEBCON_2015-07-09_File.pdf -
The words in the file name are separated with the
-symbol and end with .docx or .pdf extension:
^[a-zA-Z0-9]+(?:-[A-Za-z0-9]+)*\.(docx|pdf)$
Correct expressions: WEBCON-File-New.pdf
Incorrect expressions: WEBCON_File_Old.docx
8. SQL query
The field allows for specifying source files based on an SQL query. The query should return a list of attachment IDs from the "WFDataAttachmets" table.
Select [ATT_ID] from [WFDataAttachmets] where [ATT_Name] = 'file.xlsx';
9. Document template
The section becomes active after selecting the option From document templates process in the File selection field. Two options are available here:
- Template source – requires a user to specify a data source and the required template,
- Dynamically calculated – requires the use of a document ID with the following format: /DOCTEMP/GUID/filename.
/DOCTEMP/ec3b6447-417c-4250-ba7b-0534fdacdd2c/template.html
/DOCTEMP/ec3b6447-417c-4250-ba7b-0534fdacdd2c
ec3b6447-417c-4250-ba7b-0534fdacdd2c#template.html
ec3b6447-417c-4250-ba7b-0534fdacdd2c
10. Variables editor
Dynamically generated tree containing all variables that may be used in the current location of Designer Studio. Information on how to use variables in WEBCON BPS, as well as a list of variables can be found in the dedicated section.
Mapping
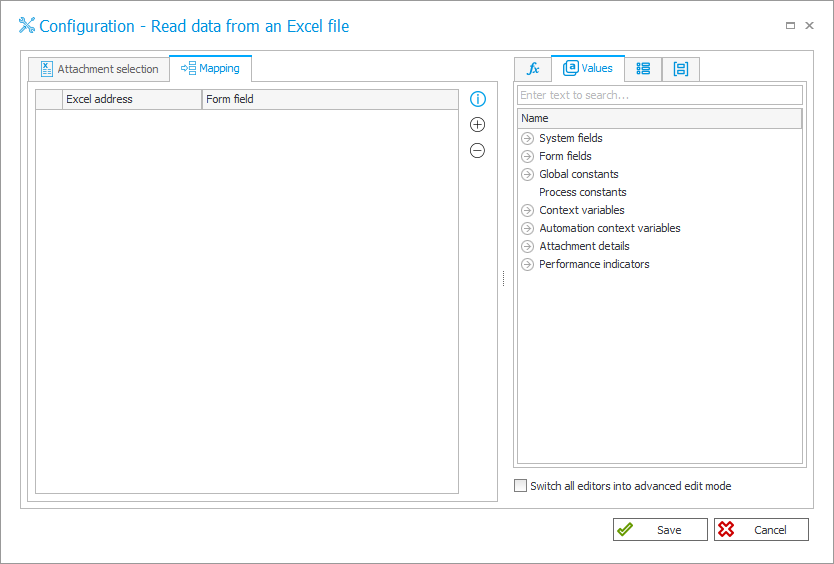
The tab allows you to specify a list of form fields based on which the corresponding cells of the MS Excel worksheet will be created.

The Excel address referring to respective Excel cell should be given by default in the format:
<Worksheet name>!<Cell address or table name>, while the Form field section should include the name of the form field to be mapped into a cell / cells of an Excel file.
To select an "A1" cell, enter: Sheet1!A1
To select a table named "Table1", enter: Sheet1!Table1
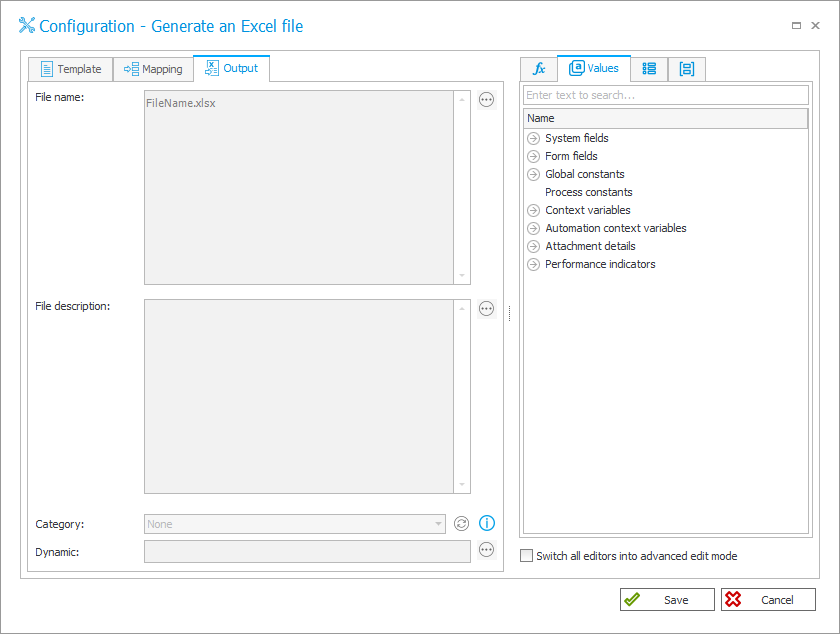
Output
The configuration of this section is required if you select New attachment in the Save mode field.

Both the file name and the description can be generated dynamically based on variables from the editor available on the right.
It is also possible to define an attachment Category to which every generated file will be added.
Even if the same action is executed twice, the file will not be overwritten. Instead, there will be two files available in the Attachment menu.