SDK Plugins
Plugins offer enormous possibilities to expand WEBCON BPS by additional non-standard features not included in the standard installation. They allow you to create components that integrate with external systems and handle unique cases not supported regularly.
This page details how to create your own plugins and then register them i Designer Studio. The second page lists all the different plugin types and how their configuration works.
Website dedicated to plugin developers: WEBCON BPS Developers
Creating plugins
The SDK package for WEBCON BPS can be found in the Documentation catalogue inside the installation folder, it contains the following modules:
- WEBCON BPS API documentation
- Plugins examples
- Visual Studio plugin templates
To begin creating plugins, it is best to start by installing plugin templates for the Visual Studio tool. When you add a new C# project in Visual Studio, plugin projects should be shown. You may also create a plugin in an existing Visual Studio project by choosing “Add New Item” from the context menu and finding a suitable plugin.
Once a plugin is created, you must register it in the Plugins section of WEBCON BPS Designer Studio. Once registered, you may then use the Plugin during normal WEBCON BPS configuration in areas appropriate for the plugin type.
e.g.: Custom actions may be used in the workflow configuration or to create action templates:
- Add a new action definition as normal
- Select Run an SDK action as the action type
- Find and select your registered Custom action in the Plugin (SDK) dropdown.
Registering plugins in Designer Studio
Before a plugin can be used in WEBCON BPS Process configuration it must registered in the Plugins section of WEBCON BPS Designer Studio.
To register a plugin, add a New definition to the appropriate node of the plugins tree.
You can use the Test button in the lower-right corner to verify whether a plugins has been registered correctly – if the test result is positive, the plugin can be used in regular WEBCON BPS process configuration.
The plugin registration form is similar for all plugins, the Content section has two different variants depending on the plugin type (ASCX control URL address field will be active or grayed out, more information below).
Additionally, Custom action type plugins will have a section at the bottom of the registration form which displays Action triggers on which the action can be configured. Availability is configured in the plugin code, and cannot be changed here.
Plugin registration form:
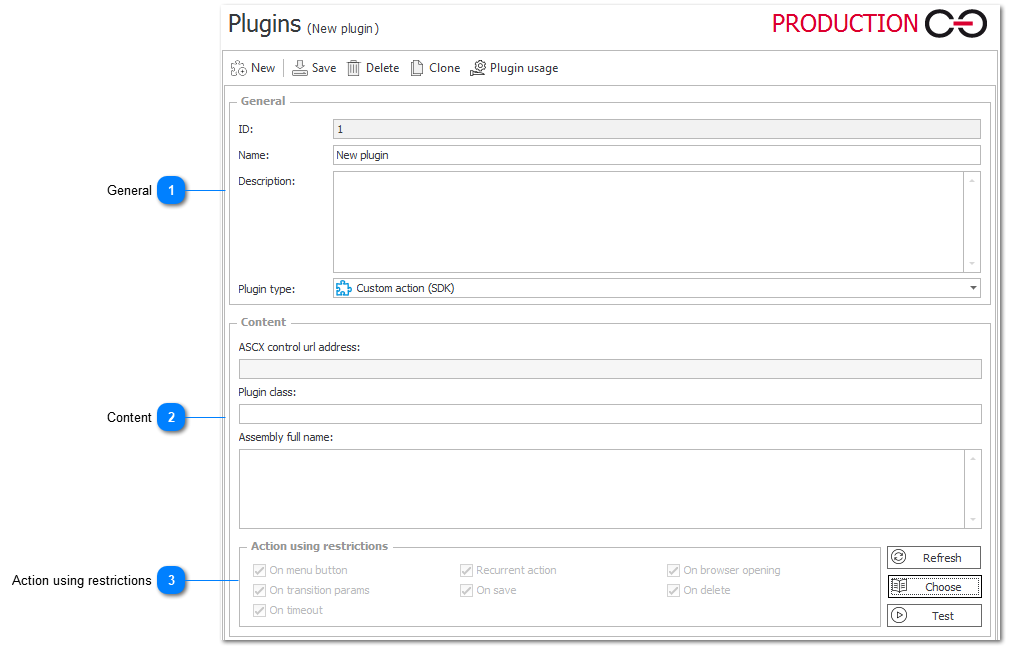
1. General
Define the basic parameters like the Name, Description, and Plugin type (changing the type will move the definition to the appropriate node on the tree).
2. Content
The content configuration section has two different variants depending on the selected plugin type:
- Variant I (ASCX control URL address grayed out) – Plugins are created as an implementation of the plugin base class, placed entirely inside the DLL file. This variant includes plugins such as: Custom Action, Items List Customization, Label Printout Template, Custom Data Source, Flow Control, and Business Rule.
Click on the Choose button to open the plugin base class selection window.
The Show button will display DLL files whose names begin with the entered phrase. The file list is loaded from the GAC (Global Assembly Cache) catalogue and from the SharePoint application bin catalogue. Therefore, it is recommended to use a common prefix such as WEBCON.WorkFlow.Extensions for DLL files that will implement plugins.
DLL files will be listed by file Name, Source (GAC or bin), Version, and a fragment of the PublicKey with which the file was signed.
Choose a suitable file, the list of classes implementing the plugin base class will be filled automatically. Selecting a desired class will display the plugin name and description – these values are defined by the plugin creator in its source code.
- Variant II (ASCX control URL address active) – Plugins are created as a user control and implemented by placing an ASCX file in the SharePoint structure and deploying the DLL file. This variant includes plugins such as: Custom Control, Field Customizations, Item List Controls.
To register a plugin created as a user control, choose the control ASCX file location. Click on the Choose button to open the ASCX file selection window.
Type in a fragment of the ASCX file address and click Show to load a list of plugin ASCX files. Select the file that you need and click the Get properties button to fill out the rest of the fields in the window.
3. Action using restrictions
Custom action plugins only
This section displays Action triggers on which this action can be configured. The availability of the action is configured in the plugin code, and cannot be changed here. This section is for information only.