Business rules
Business rules are used to create universal expressions and conditions to control processes' behavior. Using them is a convenient alternative to employing SQL expressions. Creating business rules is intuitive. They can be stored in one place and grouped for easy access.
Rules are defined globally in System settings or for an individual process. Once they are defined, rules may be used in any area of Designer Studio where a query can be applied (provided that the data type returned by the rule matches the data type expected from the query).
Adding a rule
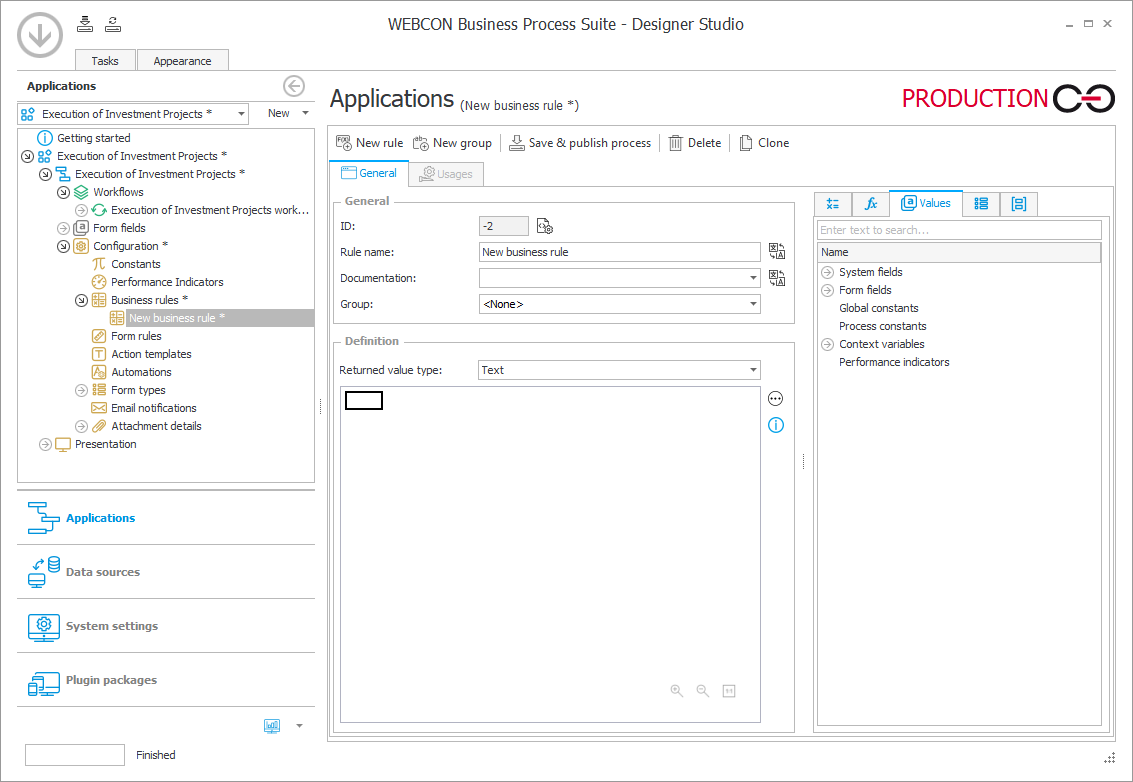
To add a business rule to be used only in a given process, go to the Configuration node available in the application tree. Select Business rules, and then click the New rule button on the right.
Once a rule is defined, it can be used anywhere in Designer Studio where query input is available. This is possible if the rule returns the correct data type for that location.
If it is necessary to change a business rule, simply apply the changes to the location where the rule was defined (i.e. globally in System settings or in the configuration of a particular process). It is not possible to modify the rule separately at each location where it is used.
Business rules can be grouped. To create a group of business rules, hit the New group button, and then drag and drop the available rules in the newly created group.
Creating a rule
Both business rules and form rules can be built in two ways:
- by dragging and dropping elements from the right-hand dictionary (①) to the work area (②). You can also select where you want to add an element in the work area – find this element in the dictionary, and double-click it. This will add it to the selected place,
- by activating the work area (②) and starting typing in it. To activate the work area, click inside it or select it with the Tab key. Then, start typing the first letters of the element you want to insert, for example, the operator's or the function's name. The program will suggest matching elements. You can accept and insert them into your rules by pressing Enter or by double-clicking them.
Please note that you do not need to use the mouse to create and navigate rules. You can move between the elements using the Tab and the arrow keys on your keyboard. To accept a change or selection, press Enter.
For details, see the article Creating business/form rules without the use of a mouse on our technical blog.
Returned value types
Business rules can return various types of data. The returned value type also defines the availability of the rule – i.e., certain query fields expect a specific type of data – only rules that return a particular type will be available in that field. Business rules can return the following types of data:
Value – text (any character string), decimal (a floating-point number), date (date).
Used for: defining default vales of form fields.
Execution condition – Boolean (rule returns "True" or "False").
Used for: defining conditions for executing actions, and in the step of "Flow control" type (when a path is chosen based on a form field value).
User list – this rule can return a list of users (or groups) in the format: ID#Name. The identifier (ID) can be either an email address or login. The Name is optional.
Used for: defining the visibility of a form field, visibility of a form field in a specific step, and the visibility of a path.
Edit rule
After clicking the Edit button (icon with three dots) available to the right of the work area, the Edit rule window opens:
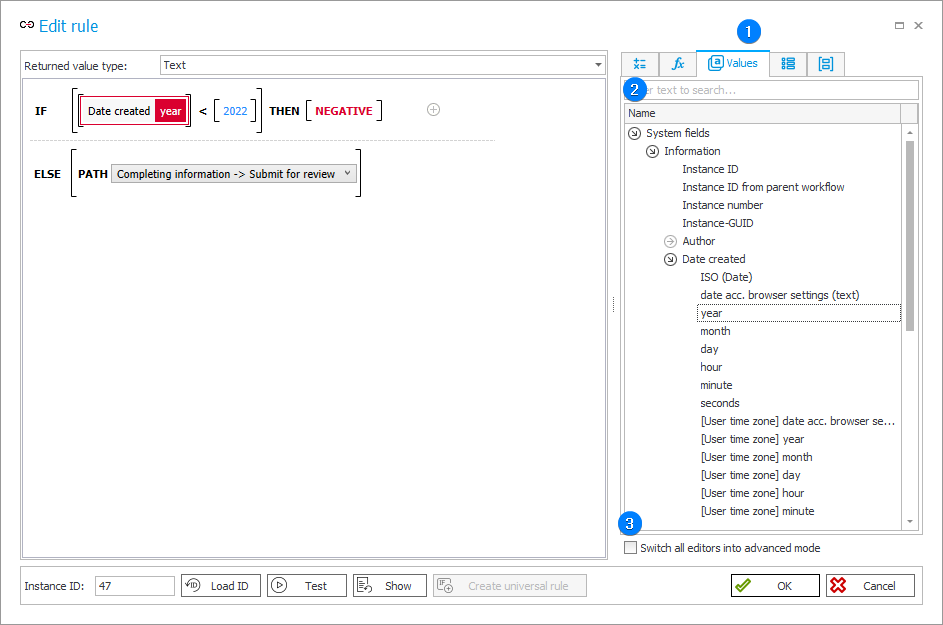
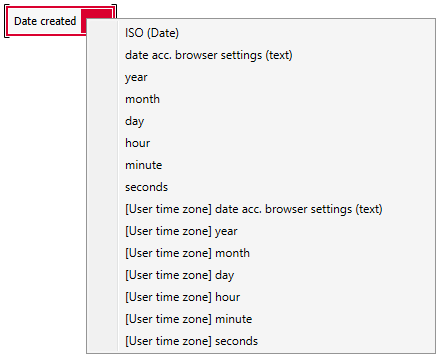
The dictionary (①) is also available in this window. To make the creation and using of rules easier, all variables available in the dictionary are converted into cohesive objects that are convenient to use and display both an intuitive variable name and its variants. You can drag variables to the editor from the tree on the right side or insert them in the place of the cursor by double-clicking on the tree element. If a variable has variants (for example, different parameters, such as the email address or the username of the manager, can be extracted from the "Current user" variable), these variants appear when you right-click on the element. You can delete an object by clicking on it and pressing Delete or Backspace.
The variables tree is built dynamically depending on the context in which the editor has been launched. You can search for desired elements inside the tree by entering an expression in the filter field (②). The content of the filtered tree changes automatically after each change of the entered text. You can restore the tree to its original form by deleting values entered in this field.
The Edit rule window also features the option Switch all editors into advanced mode (③). When selected, all dictionary elements are displayed as tagged variables with their designations (fields) in the database.
Testing rules
You can test if your rule works using the dedicated options in the bottom of the Edit rule window:
- Instance ID – identifier of the workflow instance that will be used to test the rule or preview the expression,
- Load ID – loads the ID of the last workflow instance created in the process and inserts this value in the instance ID field,
- Test – performs a test of the rule with the variable values loaded in the context of the specified workflow instance. If the test passes correctly, the Expression preview window is displayed with the value returned by the rule for that workflow instance,
- Show – opens a window where the expression is displayed with the variable values taken from the specified workflow instance.
![]()
The option Create universal rule is available from the application level. Selecting this option and saving the newly-created rule as a process rule will make it available in the selected process.
Tooltips and contextual help
To learn more about an operator or function that is placed in the work area, hover your mouse cursor over the desired element to view its description and an example of use.

Dictionary elements for building rules
When creating rules, you can use the dictionary of elements (also known as Variables editor or Expression editor) available on the right-hand side of the window. This is a tool that supports the writing of expressions containing variables, i.e. strings of text, which are usually limited by curly braces "", have a special meaning in the system, and are converted into corresponding text expressions during execution.
The elements for building rules are organized in the following tabs:
Operations
The tab offers the following elements for building rules:
- Arithmetic operations – add (+), subtract (-), multiply (*), divide (/),
- Logic operations – used to expand function conditions with "AND", "OR", "NOT".
- Comparisons – the following operations are available:
- = – equal, is identical,
- <> – not equal,
- > – greater than,
- >= – greater than or equal to,
- < – lesser than,
- <= – lesser than or equal to,
- EMPTY – empty (no value).

Functions
From this tab, you can add to your rule available Global business rules and Process business rules, as well as Integration and Functions. For ease of use, functions are arranged into categories.
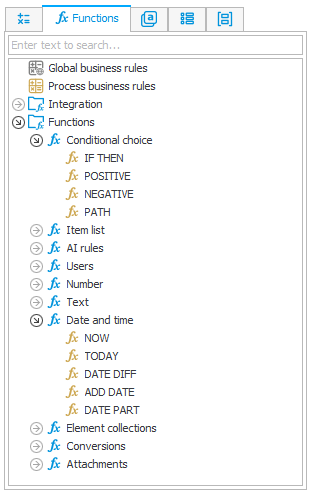
Conditional choice
This directory contains the IF THEN function to create a logical condition.
A sample rule using IF THEN condition:

Additionally, you can choose from the following elements:
- POSITIVE – for specifying the condition as fulfilled (YES, TRUE, 1),
- NEGATIVE – for specifying the condition as unfulfilled (NO, FALSE, 0),
- PATH – for selecting a path from a given process.
Item list
The functions relating to the Item list form field are only available when creating business rules for individual processes (they are not available for global business rules). They include:
- ITEM LIST COUNT – returns the number of rows of the Item list,
- HAS ANY ROWS – returns "TRUE" if the list contains an element; otherwise, it will return "FALSE",
- SELECT VALUES – allows you to return values from the Item list. After selecting the function in the editor, specify the column from which the values are to be selected.
AI rules
The functions related to the AI analysis mechanism allow the following actions:
- AI ANALYSIS RULE COUNT FOR INSTANCE – counts how many AI rules are applied to the workflow instance,
- AI ANALYSIS BROKEN RULE COUNT FOR INSTANCE – counts how many AI rules have been broken in a workflow instance,
- AI ANALYSIS SCORE FOR INSTANCE – returns the AI analysis elements for a workflow instance.
Users
- CURRENT USER IS ONE OF – checks if the current user is in a specific group of people; if so, "TRUE" is returned, otherwise "FALSE",
- USER IS ONE OF – checks whether the given user, list of users, or group is included in the given list or group of users,
- USERS – the function allows you to download a list of users as a collection of ID#Name values separated with semicolons (;),
- GROUP MEMBERS – allows for assigning tasks directly to group members. By using the BPS_ID, it loads a list of all users that are members of the selected group, including any embedded subgroups. The user list is returned as a collection of values, i.e. ID#Name, separated with semicolons,
- SUBSTITUTES OF – returns a collection of all current substitutes in task delegation mode for provided user.
Number
- ROUND – a function for rounding numerical values, allows you to indicate the precision of rounding.
ROUND [1.25] [1]returns[1.3],ROUND [1.25] [0]returns[1],ROUND [11.25] [-1]returns[10].
Text
You can use the following functions that operate on text values:
- TO UPPER – converts a text value to capital letters, e.g., contract → CONTRACT,
- TO LOWER – converts a text value to lowercase, e.g., CONTRACT → contract,
- TEXT LEN – returns an integer value representing the number of characters in the text (string),
- SUBSTRING – allows you to extract a text fragment based on the starting character's index and the number of characters to be downloaded. The first character in the text has an index = 1,
- STRING REPLACE – allows you to replace a phrase in a given text with another phrase,
- INDEX OF – returns the position of the first occurrence of the specified string in the provided text. This function searches the text starting from the indicated position. The first character of the text has the value = 1,
- CONCAT – it is used to combine several texts into one text string,
- TRIM – removes whitespace at the beginning and at the end of the selected text,
- LIKE – enables checking whether the selected text contains a given text pattern. If so, "TRUE" is returned,
- CONTAINS – checks if a given text fragment is present in the selected text; if it is, it returns "TRUE". This function is not case sensitive,
- STARTS WITH – checks if the given text begins with the specified fragment; it is not case sensitive,
- SPLIT – allows you to divide the text into parts separated by a character of your choice (e.g., a semicolon). You can also use any string of characters as the separator,
- REMOVE HTML TAGS – removes all HTML tags from a given text,
- TEXT – allows to define text with translations.
Date and time
- NOW – returns the current date and time,
- TODAY – returns the current date,
- DATE DIFF – calculates the difference between two dates. You can choose to calculate the difference in seconds, minutes, hours, days, weeks, months, or years. After specifying the values, it returns the date difference as a numeric value,
- DATE ADD – adds a specific number of seconds, minutes, hours, days, months, or years to the date you select. After selecting it, select the element that determines the time from the list and indicate the numerical value to be added in the next field,
- DATE PART – the function returns an integer specifying the second, minute, hour, day, month, or year of the given date.
Element collections
- GET IDs – allows you to download a collection containing only the ID from a collection in the ID#Name format. The downloaded elements are separated by a semicolon.
GET IDs ['144 # Shock Absorber; 14 # Cooler; 4 # Gearbox] returns [144; 14; 4]
- GET NAMEs – this function allows you to download a collection containing only the names from a collection in the ID#Name format. The downloaded elements are separated by a semicolon.
GET NAMEs ['144 # Shock Absorber; 14 # Cooler; 4 # Gearbox] returns [Shock Absorber; Cooler; Gearbox]
- IS IN – checks if a given element is included in the collection of elements, returns "TRUE" or "FALSE" depending on this check's result. Elements are compared as strings, case insensitive. The comparison takes into account white space at the beginning, end, and inside the string. The function allows you to define multiple collections that will be used in the search,
- COLLECTION – a function for combining multiple collections of elements. It returns a new collection containing all combined elements,
- GET AT INDEX – loads the element from the indicated place in the collection,
- SUM – returns the sum of all values in the provided collection,
- AVG – returns the average of all values in the provided collection,
- MAX – returns the greatest value from the provided collection,
- MIN – returns the lowest value from the provided collection,
- COUNT – returns the total number of elements in the provided collection,
- DISTINCT – returns all unique values from the provided collection.
Conversions
These are the functions used for changing value type and the display format of a data type field:
- DECIMAL TO TEXT – allows you to change the value from decimal to text value,
- TEXT TO DECIMAL – enables you to change a text value to a decimal value,
- TEXT TO DATE – changes the text value to the date format,
- FORMAT DATE – allows you to format the date value according to specific requirements.
Attachments
The functions relating to attachments are as follows:
- ATTACHMENTS COUNT – returns an integer specifying the number of attachments in an instance,
- CONTENT AS BASE64 – returns an attachment in BASE64 format,
- CONTENT TYPE – returns the type of attachment that is saved in the workflow,
- FILE NAME – returns the name of the attachment file,
- GET ATTACHMENTS – returns one or more IDs of attachments added to an instance.
Integration
Business rules may contain expressions defined in SQL. To access them, start writing "SQL" in the work area. You will see a suggestion to use a SQL COMMAND. Double-click on it or press Enter to accept it. You can also use the SQL COMMAND by double-clicking it in the tree – it will be automatically inserted into the work area.

The SQL query can be configured by clicking on the icon with three dots next to the function name. This will open the SQL expression editor window, where, using SQL syntax, you can enter the desired expressions also applying the variables available in the dictionary.
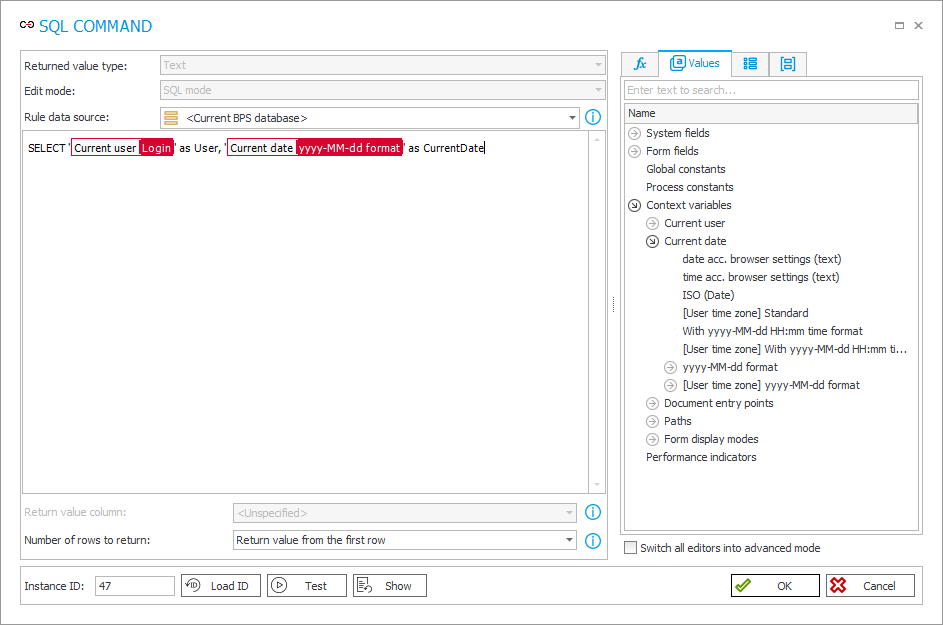
The Integration branch also offers functions:
- SDK EXECUTION – enables queries and loading values from the selected database,
- DATA SOURCE VALUE – used for loading a value from the specified column of the data source. This feature is analogous to the method of creating logic expressions in previous versions of WEBCON BPS, where such expressions were constructed via script languages.
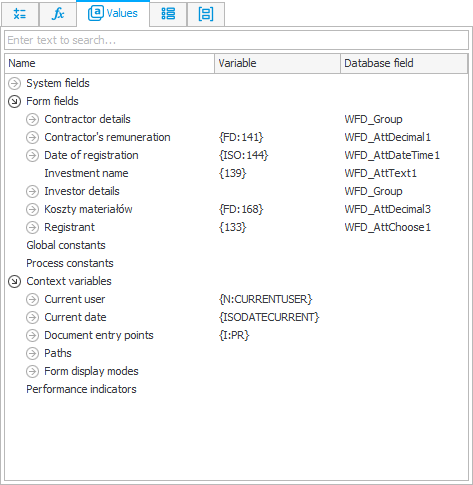
Values
The tab allows you to use the value stored in a workflow form field as a variable in a business rule. To use it in your rule, find the right form field, then drag and drop it to the right place in your function.

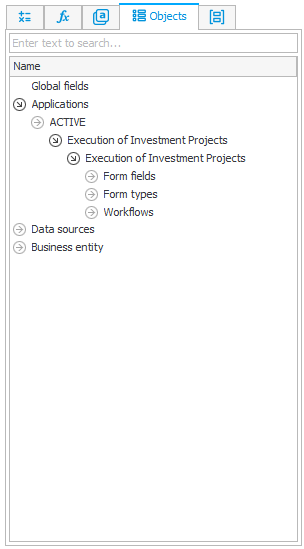
Objects
The tab offers objects that can be added to a rule. These objects can be global fields, applications, data sources, and business entities.
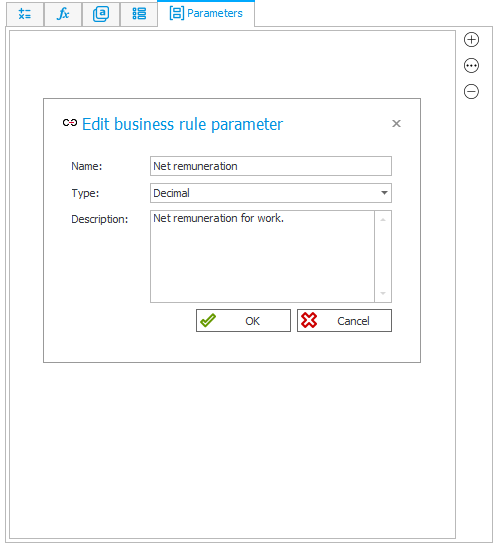
Parameters
The tab allows you to create universal business rules that can be reused in different scenarios. Each Parameter is created once, and then, for each case, end users provide the appropriate values to the rules using it.
To create a parameter, click the plus button (+) on the right. Name it, choose the parameter's Type (text, decimal, boolean, date, user list), and add a Description (optional).
The parameter will be highlighted in yellow when inserted into the business rule. Testing a rule configured in this way will require you to manually enter its value.
Sample business rule with a Parameter:
