Admin mode
A user with business administrator privileges (at the specific workflow, process, or global level) has additional options for managing workflow instances. The Admin icon () in the Form menu allows the business administrator to switch the instance from standard mode to admin mode.
In admin mode, the appearance of the form menu changes – it gains buttons for displaying instance versions at the form level (i.e. versions saved as a result of path transition, action execution, saving operation, etc.). The administrator also has the option to return to the original instance view using the Go back to instance button.
Admin actions
Enabling admin mode is equivalent to accessing admin actions (under the icon ) and putting the form into edit mode, even if the workflow instance is in the final step and all user tasks have been completed. The administrator can then edit any form fields (except data presentation fields), complete user tasks, go through the path (if available), grant privileges, and generate printouts and templates. If the data in the form is changed in any way, the instance History will display 'Updated in administration mode' in the Comments section.
Privileges
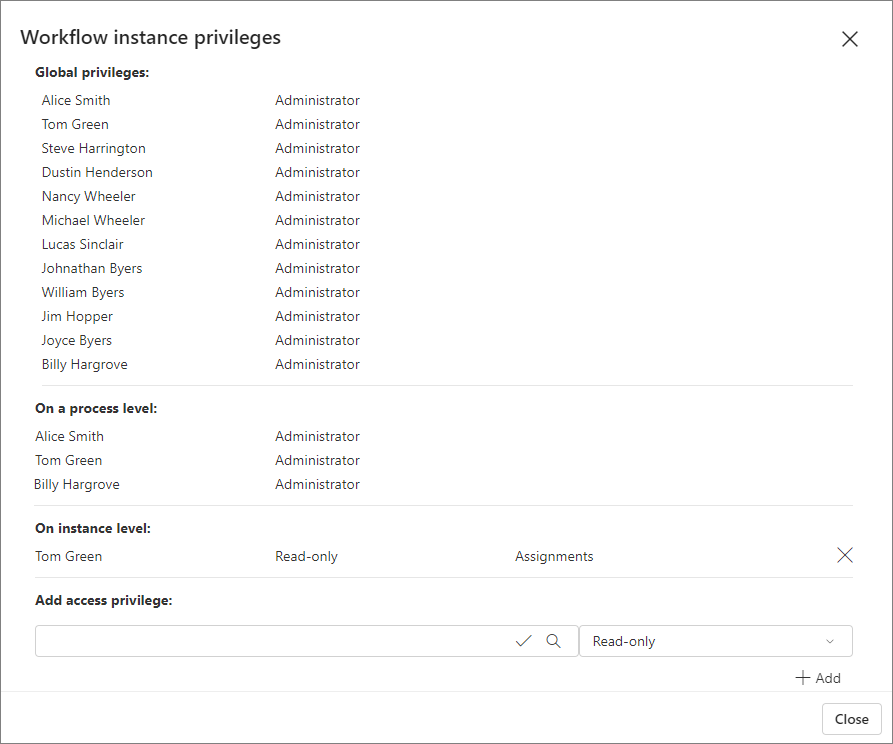
Selecting this option opens the Workflow instance privileges window, which contains a list of the privileges granted to users.

- Global privileges – privileges granted to WEBCON BPS globally; this section displays a list of system administrators,
- At the process level – this section displays a list of users (or groups of users) who have been granted process-level privileges in the application,
- At the instance level – this section contains a list of users who have been granted access to a specific instance as a result of running a process or performing an assigned task, as well as through the Add privileges action.
The window also includes an option to grant access privileges to a specific instance.
To add privileges to an instance, enter the user's details, specify their privilege level, and then press the Add button at the bottom right.
The following privilege levels are available:
- Read-only – the user can open the instance and view any attachments in the workflow,
- Read-only without attachments – the user can open the instance, but cannot view any attachments in the workflow,
- Modify without deleting – the user can change the values of the form fields that appear in the step in edit mode. They can add new attachments, but cannot delete them,
- Administrator – full rights to the instance, including the ability to delete it.
Finish all users' tasks
Selecting this option is equivalent to completing all active user tasks for the instance. This applies to both user-assigned tasks and CC tasks. When this option is selected, the instance disappears from the list of user tasks.
For more information, read the article The "Finish all users' tasks" option on our technical blog.
Timers execution statistics
Selecting this option opens a window of the same name containing a report for the administrator on the timer actions executed on the workflow instance, with their number, date and execution status. The timer can also be reset here.

Word template printout
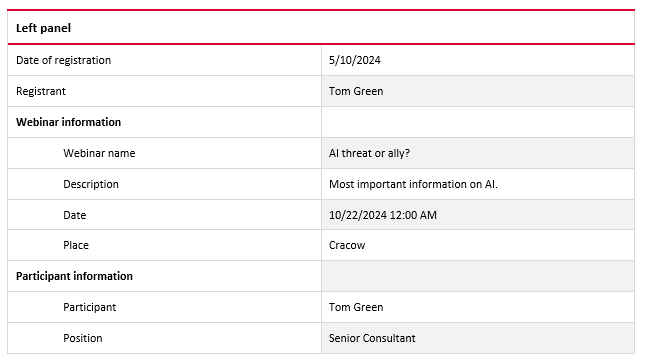
Selecting this option downloads a standard form printout in .docx format. The contents of the Word template printout are presented as a two-column table, with the names of the form fields in the left column and their values in the right column.

HTML template
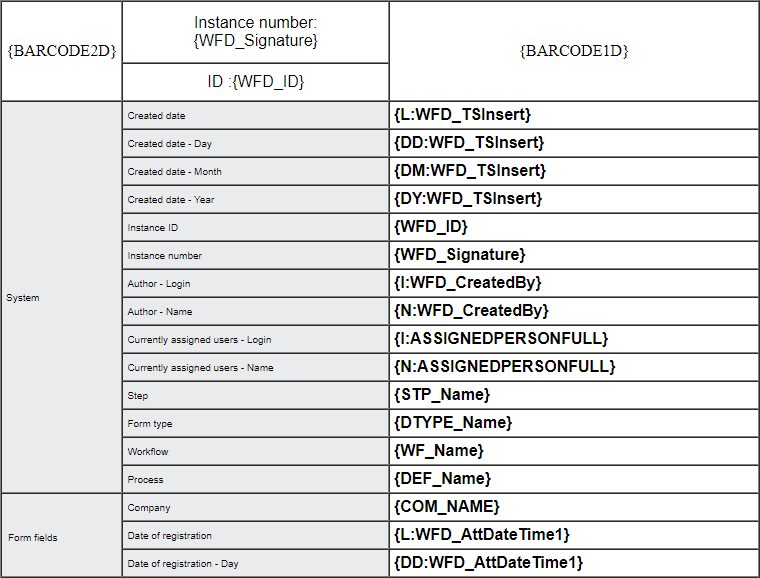
Selecting this option downloads a template in .html format, which is a tabular listing of all system and process form fields, their tags and HTML codes. This template can be stored in the Document templates process and used to generate .pdf files or send custom emails.

You can read more about HTML templates in THIS ARTICLE on our technical blog.
Word template
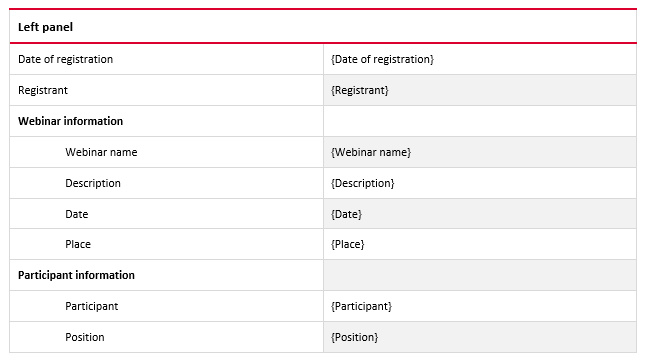
Selecting this option downloads a file in .docx format that presents all form fields defined in the process in the form of a two-column table. The left column contains the names of the form fields and the right column contains their labels. Similar to an HTML template, this template can be stored in the Document templates proces and used in file and attachment generation actions.

For more information on admin mode, read the article Administration within Portal on our technical blog.