Integrations
This section allows you to add and configure API applications and Service agents that are used to integrate with external applications and services.
API
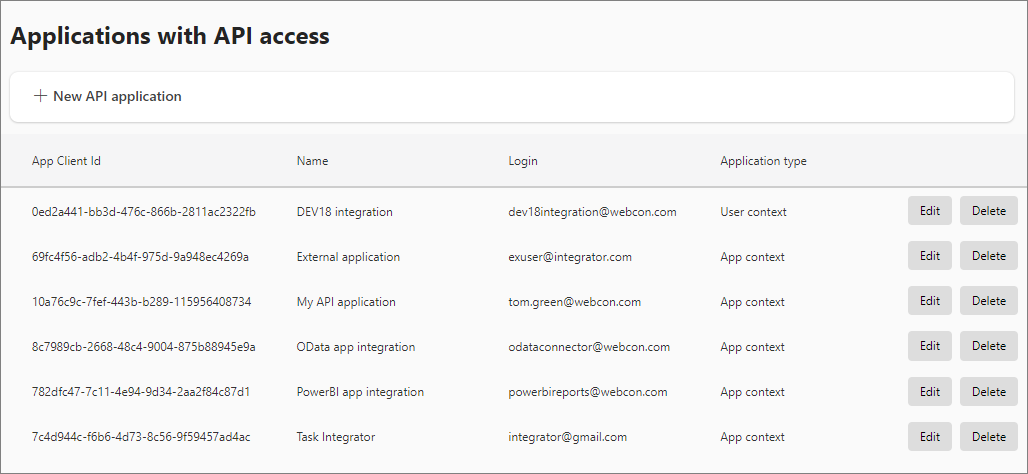
Selecting this tab directs the administrator to the Applications with API access window.

The window displays a list of all configured API applications in a given environment. It includes the following details for each application: App Client ID, Name, Login (in UPN format), and Application type.
The window also features dedicated buttons for creating new API applications, editing existing applications, and deleting applications.
Edit API
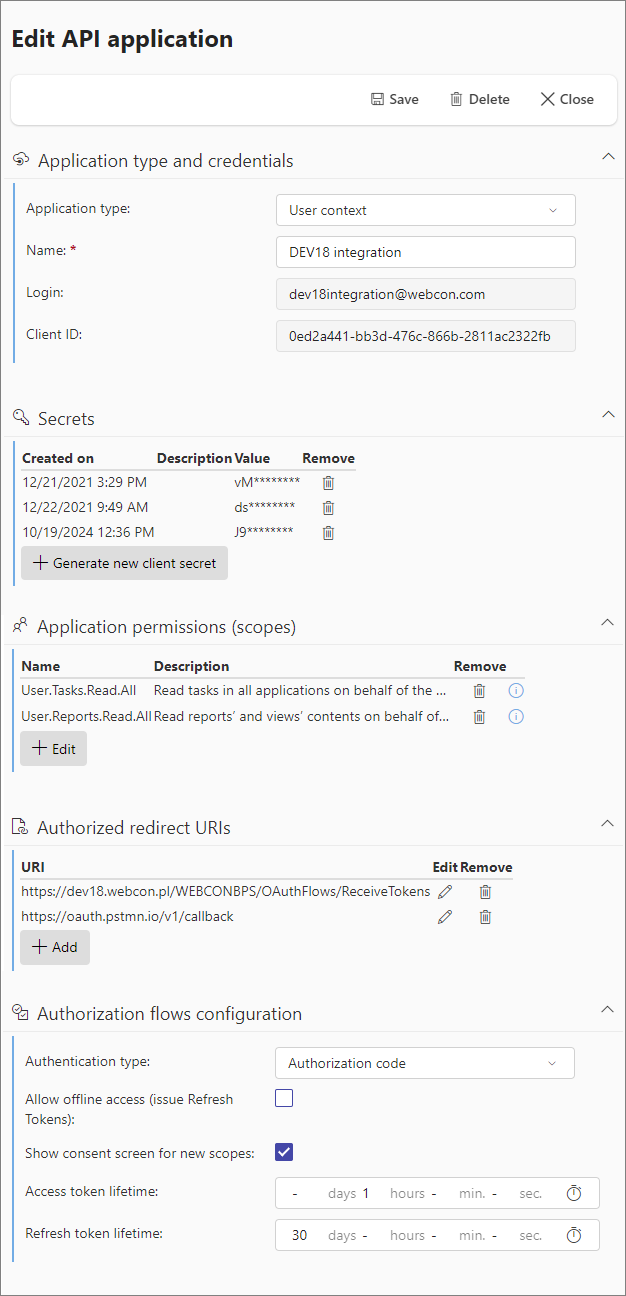
Selecting the New API application or Edit button in the Applications with API access window opens the API application edit page.

Application type and credentials
The section provides basic information about the API application, including the name and the automatically generated Client ID.
WEBCON BPS utilizes OAuth2 authentication when using the REST API. Two authentication scenarios using OAuth2, or application types, are supported:
- Application context – is used for service-to-service communication and it uses client credentials flow to authenticate. This type of application also creates a user account in WEBCON BPS, which can then be assigned permissions, tasks, etc.
- User Context – runs in the context of an existing user and uses their permissions. It uses an authorization code flow for authentication, so obtaining a token requires user interaction.
Secrets
API application uses both Client ID and Secrets to authenticate via OAuth2. Client ID is generated during application registration, while the Secret can be generated manually (after the application is saved). Each application has exactly one Client ID (that cannot be changed) and several Secrets used in different systems. New secrets can be created using the Generate new client secret button. A window will appear where you can create a secret and enter its description for further reference.
Each newly generated Secret should be saved, as it is displayed only once and cannot be restored.
Client IDs and Secrets should not be shared with anyone (like passwords), as they can be used to access WEBCON BPS data and perform actions such as reading, editing or deleting workflow instances. You should regularly check the Secrets you have created and delete those that are no longer needed.
Application permissions (scopes)
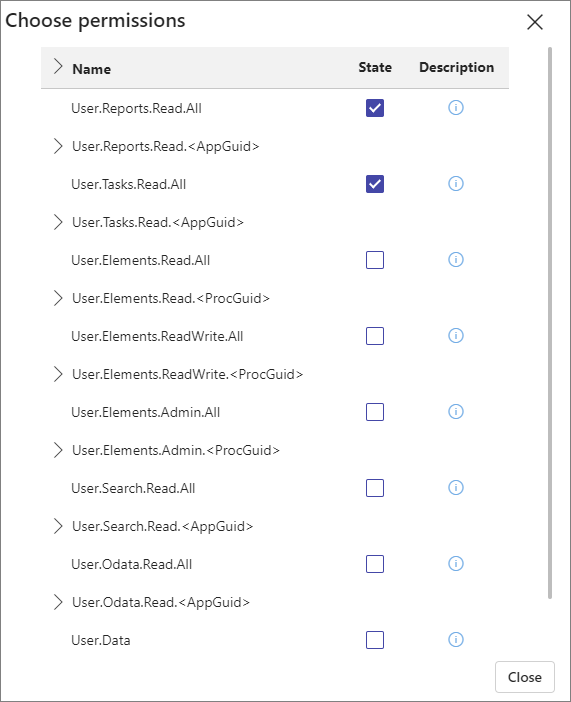
The section allows you to specify the scope of permissions that the integrating API application will have in the system. Selecting the Edit button opens a window with a list of available permissions. The content of the list of permissions is determined by the type of API application, i.e. it will differ in the application context and in the user context. For each type of permission in the list, a description is available under the (i) icon. Checking the box in the State column next to the name of the permission is equivalent to granting it to the API application. Selected permissions will be used to restrict access via access token.

Authorized redirect URIs
The option is only available for an application running in a user context. After the user has successfully authenticated the application, the BPS authorization server will redirect the user back to the application only if the requested return URL has been configured. Since the redirect URL will contain sensitive information, it is important that the service redirects the user only to trusted locations.
Authorization flows configuration
The option is available for both types of API applications, but the advanced version applies in the user context. It allows you to configure the authentication flow, and in particular to specify whether the application can use Refresh tokens. It is possible to configure the API application so that during authentication the user is presented with the scope of permissions required by the application. The user then has the option to accept or reject the requested permission scope.
The list of applications for which the user has accepted permissions is available in the Security tab in the user menu. Here the user can also revoke the permission previously granted to the application to access the system on their behalf.
This section also allows you to set the Access/Refresh token lifetime.
You can read more about the REST API at https://developer.webcon.com/docs/rest-api.
Service agents
Service agents are components that mediate WEBCON BPS communication with external systems and technologies. They are responsible for exchanging information between system components, coordinating and managing services and data flow. When you select this node in the navigation menu, the following window opens:

This is a list of all configured service agents in a given environment. It includes the following details for each service agent: Client ID, Name, Login (in UPN format), and Service rol (Printing labels).
The window also features dedicated buttons for creating new service agents, as well as editing and deleting existing agents.
Edit service agent
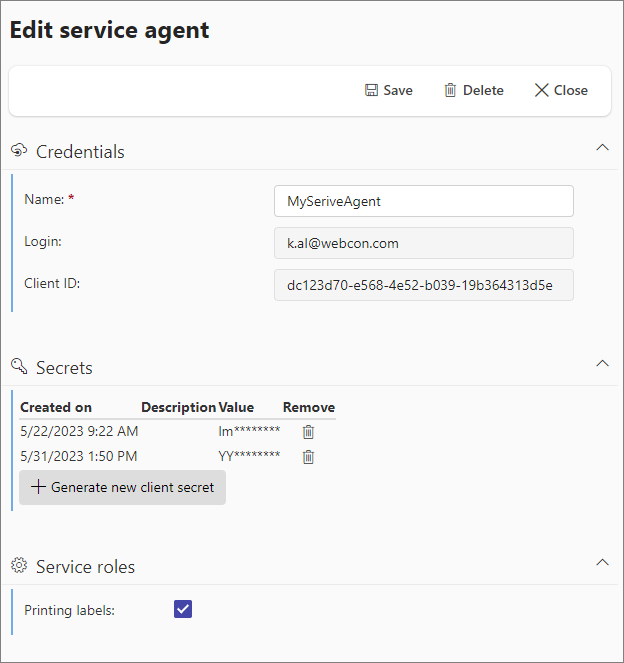
Selecting the New service agent or Edit button in the Service agents window opens the agent edit page.

Credentials
The section contains the name of the Service agent and the login of the user in whose context the agent will operate. The login should be provided in UPN format. The Client ID, as in REST API, is generated automatically for each agent.
Secrets
Service agent uses both Client ID and Secrets to authenticate via OAuth2. Client ID is generated during service agent registration, while the Secret can be generated manually (after the agent is saved). Each service agent has exactly one Client ID (that cannot be changed) and several Secrets used in different systems. New secrets can be created using the Generate new client secret button. A window will appear where you can create a secret and enter its description for further reference.
Each newly generated Secret should be saved, as it is displayed only once and cannot be restored.
Service roles
By checking the Printing labels box, you can decide whether the configured service agent will be used to print barcode labels based on previously prepared templates. The box is checked by default.
The procedure for adding a new Service agent and assigning it a role is outlined in the article Printing barcode labels in the WEBCONAPPS-SaaS environment on our technical blog.