Add a text layer
This BPS Action adds a layer of text to all PDF attachments of the workflow instance.
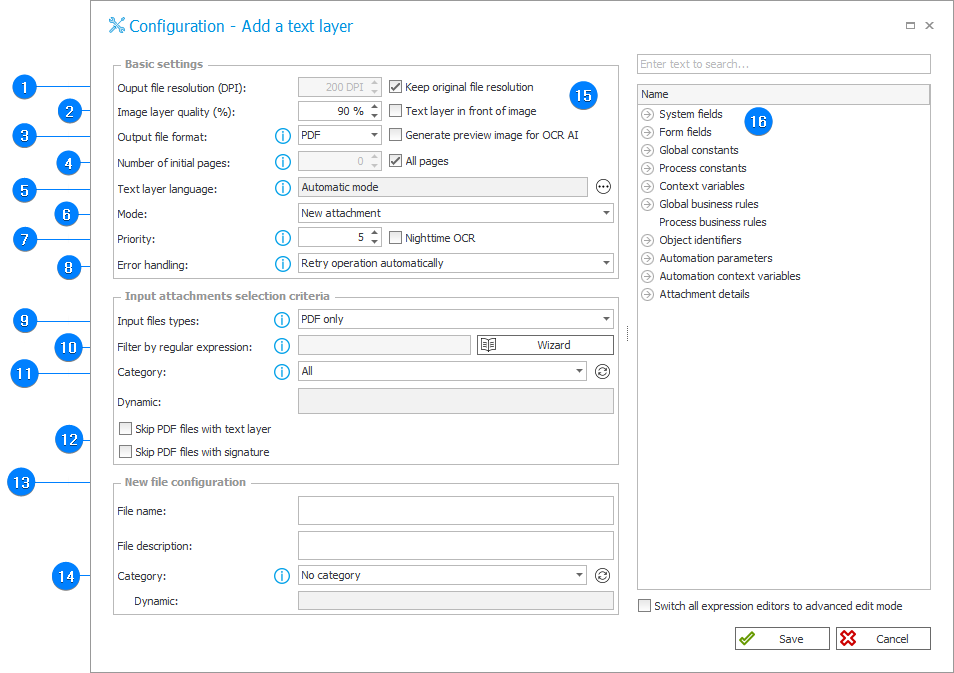
1. Output file resolution (DPI)
If the option Keep original file resolution is unchecked, this parameter will define the new resolution (from 50 DPI to 600 DPI).
2. Image layer quality (%)
The resolution of the image with the added text layer, compared to the original file.
3. Output file format
The format of the file created as a result of adding a text layer. Set this according to your ABBY FineReader license.
Available file formats:
- PDFA
- DOCX
4. Number of initial pages
The number of initial document pages for which a text layer will be created. Applies to documents that have pages, such as PDF or TIFF files.
5. Text layer language
The process will automatically recognize the document language. If the language of the document is known, it is recommended to select it from the list to greatly enhance the speed and accuracy of the recognition process. Choosing the wrong language may result in diacritic signs being ignored or recognized incorrectly. If the documents are in Russian, Ukrainian or Hebrew, it is recommended to additionally set English as a language – this will enable any Latin alphabet characters to be recognized correctly. When the document’s language is not known, Automatic mode is the recommended setting. Its usage may result in poor quality text recognition and increased processing time.
Clicking the icon with three dots will bring up a Language selection window. In order to specify a language, uncheck the Automatic mode box, and then check the desired language(-s) on the list. Currently, the following languages are supported:
- Czech
- English
- French
- German
- Hebrew
- Italian
- Polish
- Portuguese (Brazilian)
- Portuguese (Standard)
- Romanian
- Russian
- Slovak
- Slovenian
- Spanish
- Ukrainian
6. Mode
Available modes:
- New attachment – after generating a text layer, a new file is attached to the workflow instance,
- New version of existing attachment – a new version of the modified attachment is created,
- Overwrite attachment – the file for which the layer of text was generated is replaced with a new file of the same name.
7. Priority
- Priority – defines the urgency with which the task is put into the text layer generation queue. Priority can be assigned a value between 1 and 10, where 1 is the highest priority, and 10 is the lowest.
- Nighttime OCR – checking this box will cause instances to be put into the queue with a priority setting of 11 (Absolute lowest). The Action will only process instances after hours (eg. during night hours or other downtime). A schedule can be set in the Services configuration node of the System settings.
8. Error handling
Error handling determines what happens when the queued element encounters an error for the first time:
Retry operation automatically – this is the default behavior for most service queues. After the initial error occurs, the processing of the queued element is attempted four more times, with increasing wait times in between, up to the total of 5 attempts. It then waits for user action – you can use the Reports tab of Designer Studio to remove the problematic element from the queue, or reset its attempt count back to 0.
Wait for user decision – after the first error occurs, the processing of the queued element will stop altogether. You can then use the Reports tab of Designer Studio to remove the problematic element from the queue or reset its attempt count back to 0 (this will cause the service to attempt processing the element for a second time).
If you change the setting from Wait for user decision to Retry operation automatically, the processing of all queued elements whose attempt counter is less than 5 will resume. This only applies to elements that were queued by the action that is being modified (elements queued in the same queue by other actions will not be affected).
If you change the setting from Retry operation automatically to Wait for user decision, the processing of all pending elements whose attempt counter is greater than 5, will stop. This only applies to elements that were queued by the action that is being modified (elements queued in the same queue by other actions will not be affected).
Reloading service configuration is recommended after changing this setting.
9. Input files types
- All files – allows you to run text layer generation on all file types specified in the global parameter "TextLayerSupportedFileExtensions",
- PDF only – a text layer will be generated only for PDF files,
- Files filtered by regular expression – attachments are selected based on the regular expression.
10. Filter by regular expression
Field used to enter a regular expression which will be used to find files for the Add a text layer action.
Entering ".*_ocr.pdf$" will result in the selection of files with the suffix "_ocr.pdf" like: "Invoice_ocr.pdf" or "Agreement_ocr.pdf".
11. Category
Select files belonging to a specific category. You can choose from the following options:
- All – all files are added to the queue,
- Dynamic – dynamically construct a category (using variables from the editor) or enter it manually. The category can be provided in BPS format (i.e. ID#Name) or just the ID. Attachments belonging to the category will be selected based on their ID.
If searching by ID returns no results, the entered phrase will be treated as a name of a custom category (a category from outside the data source), and attachments belonging to this category will be returned. - No category – files without an assigned category are added to the queue.
Additionally, if attachment Form fields have defined categories, they will also be visible and available for selection from the Category drop-down menu.
12. Skip PDF files
Specify whether the action will also be performed for PDF files that already have a text layer or digital signatures or whether such files will be skipped.
13. New file configuration
Allows to define the Name and Description for the newly generated files. Double click or drag tags from the menu on the right to enter them into this field.
14. Category
Defines what category newly generated files will be assigned to. Available options:
- No category – newly generated files will not be assigned to any category.
- Dynamic – selecting this option will enable the text field below. Newly created files will be assigned the category entered in that field.
Additionally, if attachment Form fields have defined categories, they will also be visible and available for selection from the Category drop-down menu.
15. Additional settings
- Keep original file resolution – the resolution of modified file will be the same as before the layer of text was added.
- Text layer in front of image – defines if the layer of text should be in front of the image. Recommended for files with low DPI and low image quality.
- Generate preview image for OCR AI – generates preview which can be viewed in the OCR verification step.
- All pages – allows to add a text layer to all document pages.
16. Variables editor
Dynamically generated tree containing all variables that may be used in the current location of Designer Studio. Information on how to use variables in WEBCON BPS, as well as a list of variables can be found here.
For more information, see the article Searching for attachments using the "Add a text layer" action on our technical blog.