WEBCON BPS
Documentation
2023 R3
  • 2025 R2
  • 2025 R1
  • 2024 R1
  • 2023 R3
  • 2023 R2
English
  • English
  • Polski
ctrlK
  • Introduction
  • Getting started
  • Designer Studio
    • Licenses
    • Main menu
    • Designer Studio Toolbar
    • Applications
    • Processes
    • Workflows
    • Actions
      • Sequence of action execution
      • OCR and scanning
      • Notifications
      • Form
      • Task assignment
      • Privileges and public access
      • Workflow control
      • Substitutions
      • Excel, Word and PDF
      • Reports and printouts
      • Digital signatures and certificates
      • Barcodes
      • BPS users and groups
        • BPS users list synchronization
        • Delete BPS user
        • Delete BPS group
        • Create BPS group
        • Add/Remove single user to/from BPS groups
        • Add/Remove multiple users to/from BPS group
        • Create BPS user
        • Edit BPS user
        • Manage BPS user licenses
      • Exchange
      • Active Directory
      • SharePoint content
      • SharePoint users and privileges
      • Integration
      • Attachments
      • Database retention
      • OneDrive
      • Performance indicators
    • Automations
    • Importing and exporting applications
    • Variables
    • Business rules
    • Form rules
    • Administration tools
    • Data sources
    • System settings
    • Reports
    • SDK plugin packages
  • Mobile application
  • MS Office Add-Ins
  • Guides
This is documentation for WEBCON BPS 2023 R3, which is no longer actively maintained.
For up-to-date documentation, see the latest version (2025 R2).
  • Designer Studio
  • Actions
  • BPS users and groups
  • Create BPS user
Version: 2023 R3

Create BPS user

The action allows you to create a new BPS user.
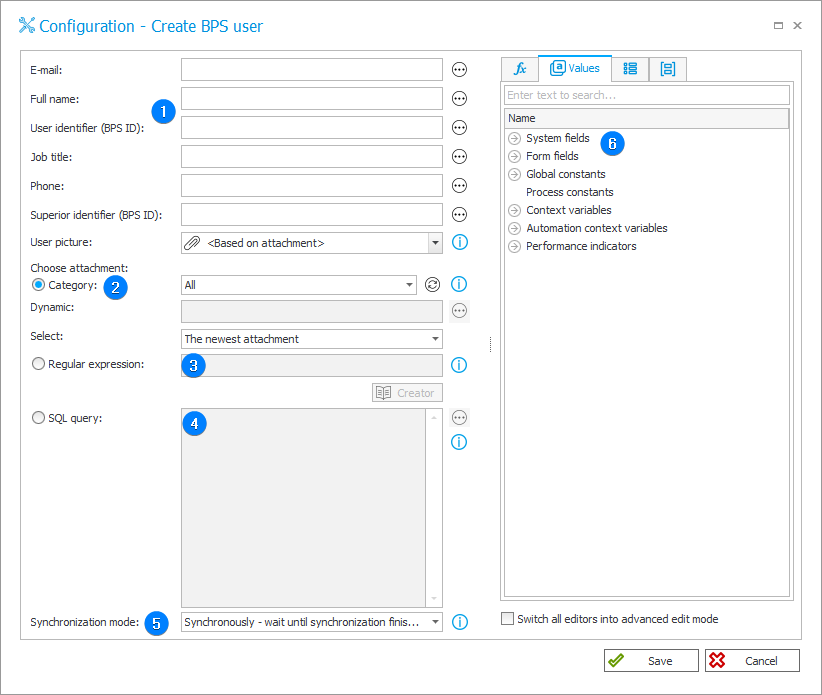
Create BPS User

1. Basic information about the user​

Details of the created user, such as E-mail, Full name, Job title, identifier (BPS ID), etc.
The fields can be filled in manually or dynamically using the values available from Variables editor.

2. Category​

This section is available if the option Based on attachment is selected in the User picture field.

Attachments to be processed will be selected based on their category. Define it by selecting one of the following options:

  • All – attachments belonging to all categories will be selected,
  • Dynamic – create the category dynamically (using Variables editor) or enter it manually. The category can be provided in BPS format (i.e. ID#Name) or as ID.
  • No category – attachments not belonging to any category will be selected.

Additionally, specify which attachments from the chosen category should be selected: only The oldest attachment or only The newest attachment.

3. Regular expression​

Attachments to be processed will be selected based on a regular expression.
Use the Regex Creator as an aid in constructing the expression.

4. SQL query​

Attachments to be processed will be selected based on an SQL query.
This query should return a list of attachment IDs from the "WFDataAttachments" table.

5. Synchronization mode​

After updating user or group data, it is necessary to carry out an independent synchronization operation. Data synchronization may take up to a few seconds, and the user’s data will not be available in the system until it is complete.
Available synchronization modes:

  • Synchronously – wait until synchronization finished – the action will be considered complete after user data is synchronized. It is recommended to use this mode when there are sequential actions after this one that will need the updated data.
    This mode will cause the user data to be added or updated outside of the transaction in which a sequence of actions are executed. If one of the sequential actions in the transaction returns an error, the withdrawal of the transaction will not cause user data changes to be reversed. Updated user data will remain in the system.
  • Asynchronously – do not wait until synchronization finished – the action will invoke a user synchronization but will not wait for it to complete. The synchronization will be carried out as the last operation after the transaction completes successfully. If one of the sequential actions in the transaction returns an error, the withdrawal of the transaction will also cause user data to not be entered into the system.

6. Variables editor​

Dynamically generated tree containing all variables that may be used in the current location of Designer Studio. Information on how to use variables in WEBCON BPS, as well as a list of variables can be found here.

info

You can read more about the action in the article Creating, deleting, and editing individual users in WEBCON BPS on our tech blog.

Previous
Add/Remove multiple users to/from BPS group
Next
Edit BPS user
  • 1. Basic information about the user
  • 2. Category
  • 3. Regular expression
  • 4. SQL query
  • 5. Synchronization mode
  • 6. Variables editor
WEBCON is the leading European-based provider of a complete Low-code Application Platform for mass delivering business solutions. Companies choose WEBCON to dramatically reduce time and cost of app development. The platform allows them to automate and manage business processes across the entire organization – using a single, unified platform. Thanks to its unique InstantChange™ technology, WEBCON embraces change like no other platform on the market.
  • Copyright © 2025 WEBCON
Platform
  • The latest version
  • InstantChange™ Technology
  • WEBCON BPS overview
Community
  • WEBCON Community
  • Developer portal
Meet us
  • About WEBCON
  • News
  • Contact
Copyright © 2023 WEBCON

Did you know that with WEBCON you can automate virtually any process? Even baking cookies 🍪.

Speaking of cookies: we use the ones that are essential for our website to function properly, as well as additional ones that help us customize our content to your preferences. If you don’t mind cookies, click Accept. If you want to learn more, explore settings.