Add attachment to another workflow instance
The action adds an attachment from the current instance to a different instance, including those that belong to a different workflow or process. The action configuration requires specifying the target instance and defining at least one attachment to be added.
Instance
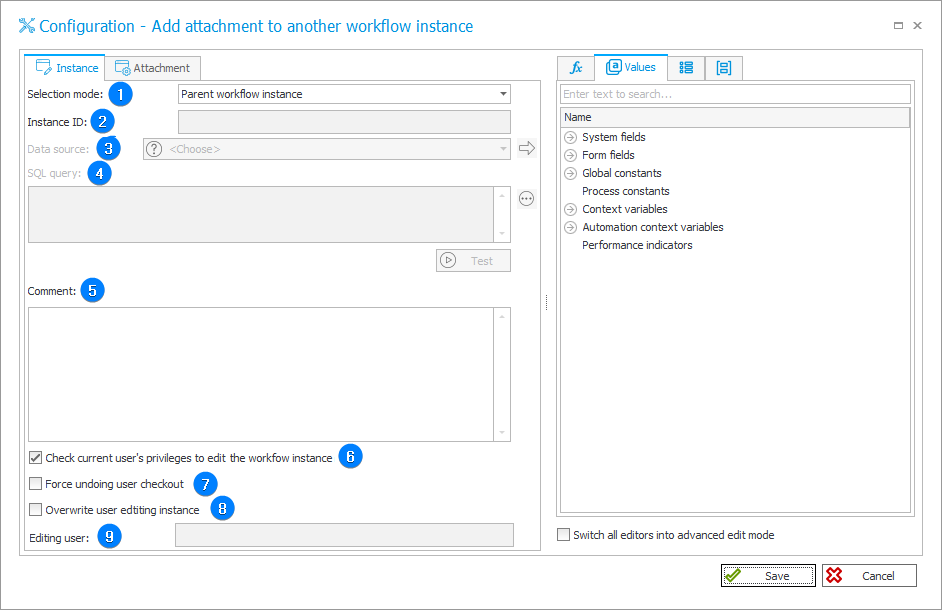
The tab allows users to specify the instance to which an attachment should be added.

1. Selection mode
The mode for selecting a workflow instance to which an attachment should be added. The following options are available:
- Parent workflow instance – when the action is invoked at the workflow instance level, the attachment is added to the parent instance;
- Form field value – when selected, the Instance ID field becomes active, requiring a variable that refers to the form field containing the instance ID;
- SQL query – selects the target instance based on an SQL query. The query should return a single column with the IDs of the target instances and may return multiple rows.
2. Instance ID
The field becomes active after selecting the Form field value option in the Selection mode field. The field requires a variable that refers to the form field containing the instance ID. The instance to which an attachment should be added is selected based on the value, i.e. ID, of that form field.
3. Data source
The field becomes active after selecting the SQL query option in the Selection mode field. Users can specify a specific data source using the selection tree, accessible by expanding the list.
4. SQL query
The field becomes active after selecting the SQL query option in the Selection mode field and defining a specific data source. Users can define an SQL query that will be used to select a specific instance.
5. Comment
A text field where users can enter an optional comment. This comment will be added to the instance to which the attachment is attached.
6. Check current user's privileges to edit the workflow instance
Once you select the checkbox, the system checks the privileges of the user in whose context the action is triggered for the target instance to which the attachment is to be added. If a user does not have the required permissions, the action is not executed and corresponding error is recorded in the event log.
7. Force undoing user checkout
When processing an instance that is checked out by another user, selecting this checkbox will prevent that user from editing and will execute the action. If the checkbox remains unselected and the target instance (to which an attachment is to be added) is being edited by another user, the action will not be executed.
8. Overwrite user editing instance
Selecting this checkbox will overwrite the information about the person who modifies the workflow instance in the History.
9. Editing user
The field becomes active after selecting the Overwrite user editing instance checkbox. It allows users to specify a person or group to be indicated in the History as responsible for modifying the instance.
Attachment
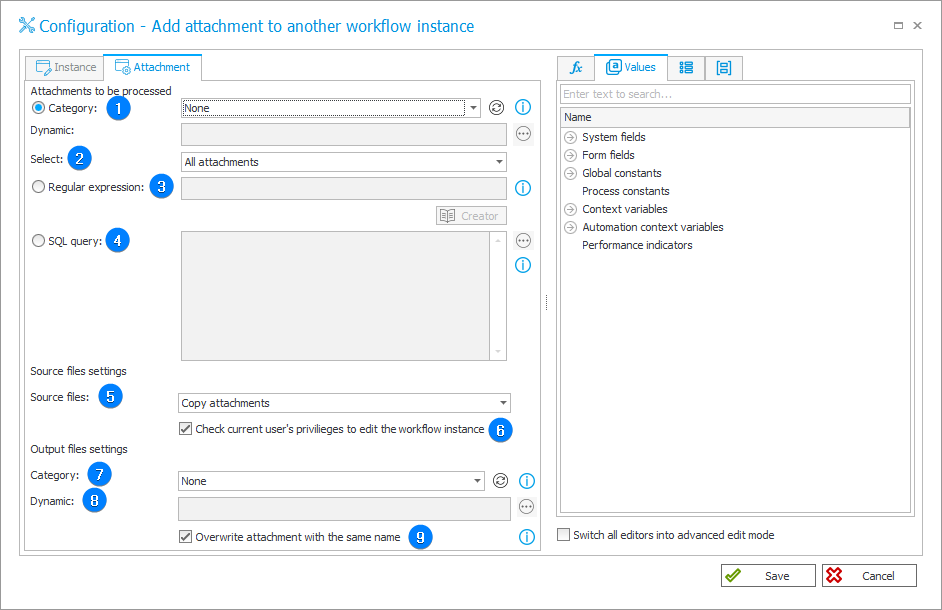
The tab allows users to define an attachment that will be processed by the action.

1. Category
The field allows users to select the category in which attachments will be searched. Apart from the categories defined in the process configuration by its designer, three built-in options are also available:
- All – searches for attachments across all categories,
- Dynamic – dynamically constructs a category (using variables from the editor) or allows manual entry. The acceptable formats are "ID#Name" or "ID", Attachments belonging to the specified category will be selected based on their ID. If searching by ID returns no results, the entered phrase will be treated as a name of a custom category (a category from outside the data source), and attachments belonging to this category will be returned,
- None – searches for attachments not belonging to any category.
2. Select
The drop-down list allows users to specify the attachments to be processed by the action. Users can select all attachments using the All attachments option or choose either the oldest or newest attachment with the Oldest attachment and Newest attachment options, respectively.
3. Regular expression
Users can define a regular expression to select attachments to be added. Clicking the Creator button located below the field opens the RegExLib creator tool.
4. SQL query
Selecting this option results in processing attachments based on the specified SQL query. The query should return the list of attachment IDs from the "WFDataAttachmets" table.
5. Source files
Defines what will happen with source files once they have been added to the target workflow instance. The available options:
- Copy attachments – attachments will be added to the target workflow instance, they will also remain in the source instance;
- Move attachments – attachments will be added to the target workflow instance. After being added, they are removed from the source instance.
6. Check current user's privileges to edit the workflow instance
If the current user does not have privileges to access the source files, they will not be added to the workflow instance.
7. Category
Defines to which category the files will be assigned after being added to the workflow instance:
- Dynamic – allows users to manually enter the name of the category to which the attachment will be assigned,
- None – after being added, the attachment will not belong to any category.
8. Dynamic
The field becomes active after selecting the Dynamic option in the Category field. You can define the attachment's category dynamically using the variable editor or manually.
9. Overwrite attachment with the same name
When selected, the category of the attachment specified in the action configuration will be ignored. The overwritten file will remain in the same category as its previous version, and a new historical version of the file will be created.