Create a group
The action is used to add new SharePoint groups.
The action's configuration window has two tabs: General and Details.
General
The tab allows you to configure basic the parameters of a new group: connection to SharePoint sites and its owner.
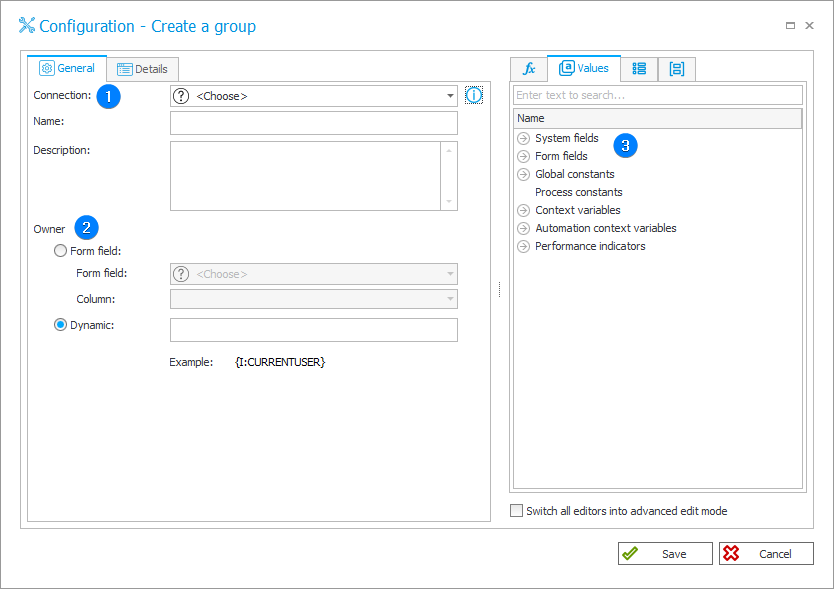
1. Connection
Specify the SharePoint site collection on which the action will be executed. This choice also affects the available privilege options that may be assigned in the action configuration.
When configuring a connection, indicate its Name and, optionally, Description.
The Default connection is only available for actions created in earlier versions of the system. For newly created actions, this connection is unavailable.
2. Owner
Details of the SharePoint group owner can be entered in two ways: statically (by specifying the relevant Form field) and in Dynamic mode (using Variables editor).
Choosing an owner by a form field involves inputting the owner's name on a form into a Person or group field. It is also possible to use Item list as a form field and then specify its column of the Person or group type.
3. Variables editor
Dynamically generated tree containing all variables that may be used in the current location of Designer Studio. Information on how to use variables in WEBCON BPS, as well as a list of variables can be found in the dedicated section.
Details
The tab contains advanced settings of the SharePoint group being created.
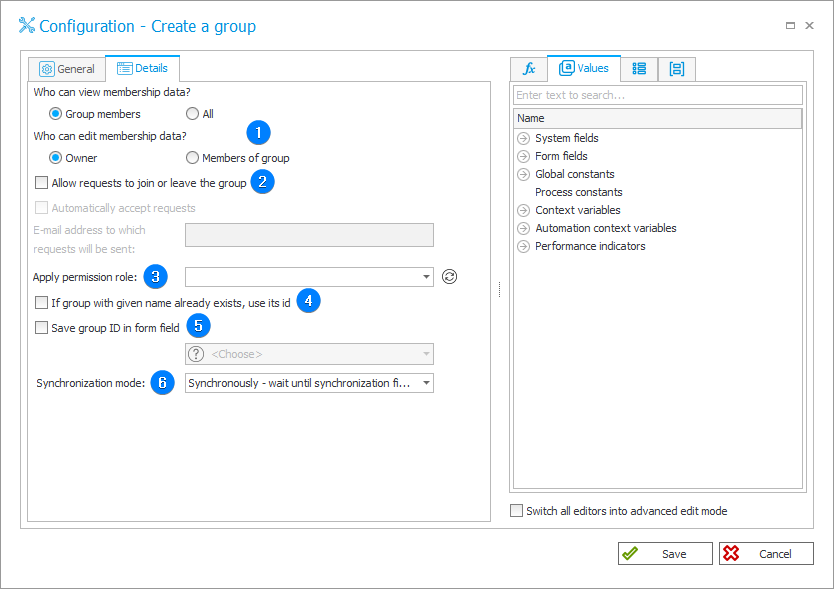
1. View and edit
You can choose between two ways of viewing and editing group membership data. Displaying data can be available to Group members or All users, i.e. also to people who do not belong to the SharePoint group being created. Editing can be done by the Owner of the group or its Members.
2. Allow requests to join or leave the group
When this option is checked, users who are (not) members of the group will be able to send requests to join or leave the group. It is possible to Automatically accept requests or to send requests to the indicated E-mail address.
3. Apply permission role
Allows you to select the appropriate privilege level for Owner of the newly created group. When you select the Load button, all default privilege levels will be downloaded from the server:
- Full Control – this privilege level contains all privileges. It is assigned to the SiteOwners SharePoint group by default. This privilege level cannot be customized or deleted.
- Design – allows to create lists and document libraries, edit pages and apply themes, borders, and style sheets onsite. By default not assigned to any SharePoint group.
- Contribute – allows to add, edit, and delete items in existing lists and document libraries. By default assigned to the Site name Members SharePoint group.
- Read – read-only access to SharePoint site. Users and SharePoint groups with this privilege level can view items and pages, open items, and documents. By default assigned to the Site name Visitors SharePoint group.
- Limited Access – the privilege level designed to be combined with fine-grained privileges to give users access to a specific list, document library, item, or document, without giving them access to the entire site. However, to access a list or library, for example, a user must have privilege to open the parent site and read shared data such as the theme and navigation bars of the site. The Limited Access privilege level cannot be customized or deleted.
4. If group with given name already exists, use its ID
If group with the given name already exists, you can use its ID to create a new group.
5. Save group ID in form field
Allows you to save group ID/name in a form field so that you can use it later. Form field types in which the identifier can be saved: Single line of text and Person or group.
6. Synchronization mode
After updating user or group data, it is necessary to carry out an independent synchronization operation. Data synchronization may take up to a few seconds, and the user’s data will not be available in the system until it is complete.
Available synchronization modes:
- Synchronously – wait until synchronization finished – the action will be considered complete after user data is synchronized. It is recommended to use this mode when there are sequential actions after this one that will need the updated data.
This mode will cause the user data to be added or updated outside of the transaction in which a sequence of actions are executed. If one of the sequential actions in the transaction returns an error, the withdrawal of the transaction will not cause user data changes to be reversed. Updated user data will remain in the system. - Asynchronously – do not wait until synchronization finished – the action will invoke a user synchronization but will not wait for it to complete. The synchronization will be carried out as the last operation after the transaction completes successfully. If one of the sequential actions in the transaction returns an error, the withdrawal of the transaction will also cause user data to not be entered into the system.
For more details on the action, see the article SharePoint Online – privileges on our technical blog.