Appearance of attachments
There are a number of options to define the appearance of attachments on workflow instances. These can be accessed in Designer Studio by selecting a workflow from the application tree, navigating to the Main form node, and opening the Global form template tab. When you click on the Attachments section available on the right, the program displays additional options for configuring attachments:
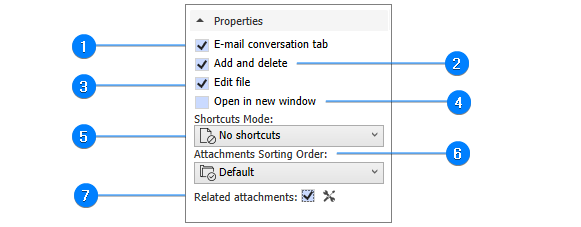
1. E-mail conversation tab
When you check this box, end users will see the E-mail conversations tab in the attachments section on the workflow instance in Portal.
You can read more about this tab in the article Outlook Classic - installation and use.
2. Add and delete
If this option is checked, end users of the form will be able to add and delete attachments.
To add an attachment, drag and drop it to the designated area on the form, or click on the Add attachment button on the workflow instance and indicate the location of the file to be added.
If a file with such a name and format already exists, a relevant message window will appear where you can confirm the addition of a file with the same name (the files will differ only in the date and time of creation) or choose to overwrite the existing file.
It is also possible to add an attachment by taking its contents from the clipboard – first copy a document or other object (text, image) to the clipboard, and then paste it using the Ctrl+V shortcut.
If you add a piece of text or image from the clipboard, a document with the appropriate extension (.txt or .png) and a name containing the date and time of its addition will be created.
To delete an attachment, click on the icon with three dots next to the file name and select Delete from the drop-down menu.
3. Edit file
Checking this box determines the availability of the Edit file option in the drop-down menu next to the attachment name on the form.
4. Open in new window
If this box is checked, the drop-down menu next to the attachment name on the workflow instance shows an option to preview the file contents in a new browser window.
5. Shortcuts mode
Select the mode of displaying buttons next to the attachment names on the form:
- No shortcuts – all options are available from the drop-down menu (icon with three dots)
- Icons – buttons for operations on attachments (Download, Open in new window, Edit file) are displayed next to the attachment names, and their availability corresponds to the configuration in Designer Studio.
6. Attachments sorting order
Select the mode of sorting attachments. By default attachments are sorted by upload date.
7. Related attachments
Enabling/disabling visibility of attachments from subworkflows, parent workflows, and attachments chosen by an SQL query. Those attachments are shown in different tabs whose names are editable. The way attachments from subworkflows are displayed differs from that of native attachments.
Click on the icon![]() to open the window for configuring the view of linked documents:
to open the window for configuring the view of linked documents:
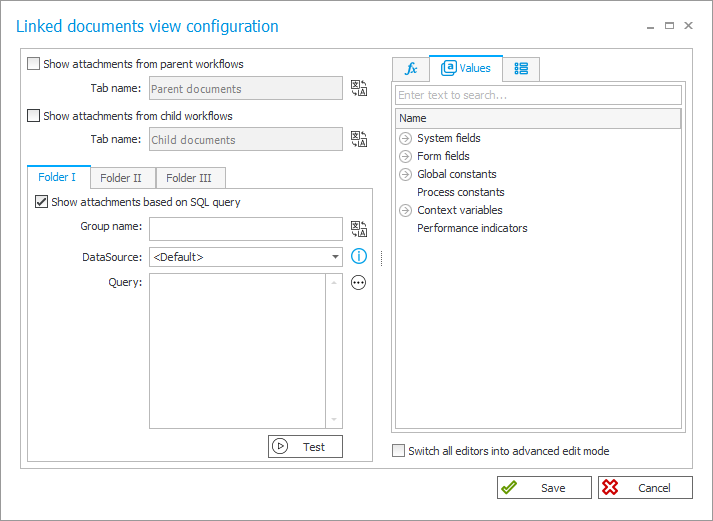
Checking the boxes Show attachments from parent/child workflows causes all files added during task execution in related workflows (parent and child) to be available in All attachments tab after the workflows in WEBCON BPS Portal are completed.
Once the Show attachments based on SQL query box is checked and the appropriate query is entered, you can define additional Folders by which the system will group attachments using dedicated form fields, for example, by creation date, author or file name. You can use the Variables editor to create the SQL query.
For detailed information on attachments and their grouping on workflow instances, see this ARTICLE on our technical blog.