Step edit
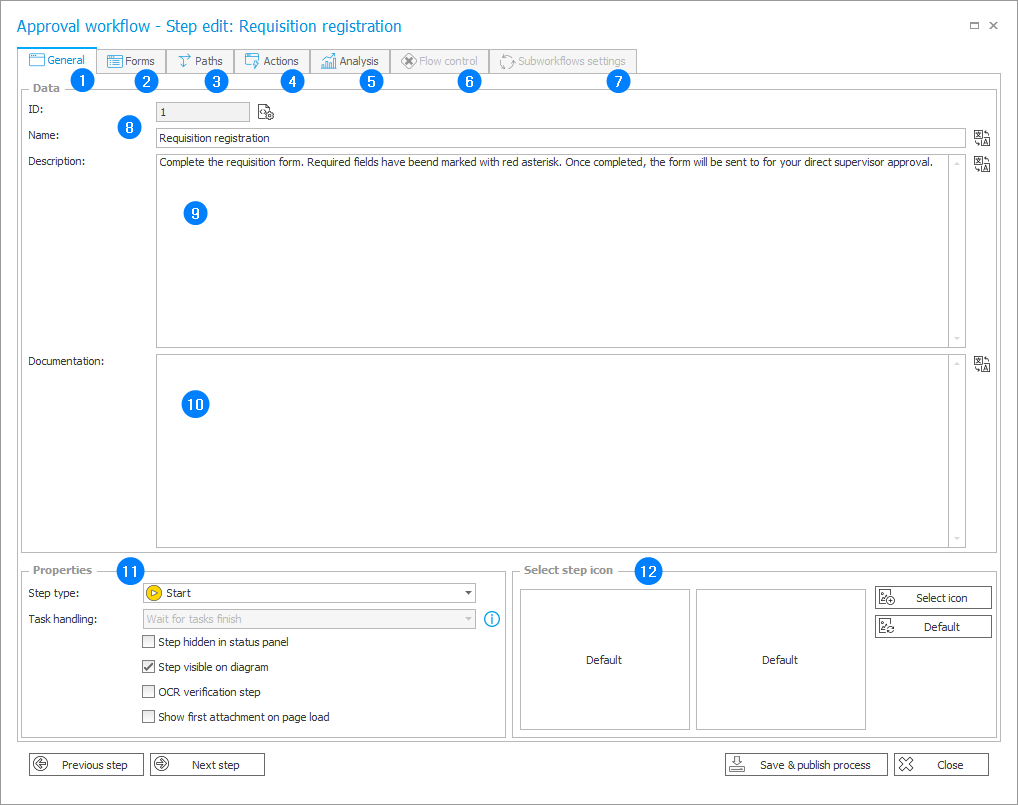
When you add or edit a new step, this edit form is displayed. It is used to define the whole business logic connected with the step, set its parameters and behavior. You can also set paths which exit the step, and set actions.

1. General
The configuration tab of basic step properties.
2. Forms in the current step
The tab contains parameters that control the layout of the form for this step. This is used to override the standard form used for the entire workflow, so that you can control the look of the form per-step. You can find more information here.
3. Paths
The tab contains a configuration form of paths coming out of the edited step. More information on the path configuration can be found here.
4. Actions
The tab contains a configuration form for actions executed on the edited step, on entry to and exit from the step and paths coming out of it. More information on the actions can be found here.
5. Analysis
Analysis of how long an instance usually is in a step. More information can be found here.
6. Flow control
The tab contains a workflow control configuration form. It is active only for steps such as Branch. More information on the configuration can be found here.
7. Subworkflows settings
The tab is activated only at the step of Waiting for subworkflows and contains a configuration form for actions included in the step. More information on subworkflows can be found here.
8. ID and Name
Step ID in the database. The value for newly created steps is completed at the moment of saving the process
The name of the step is the parameter that determines the name under which a step will be displayed on the form to the user. After clicking on the right hand side button, you will see an edit form which allows you to define the step name for different language versions.
9. Description
Description of the step. Similarly to the step name field, the description field can be set for different language versions after you click on the button on the right hand side.
10. Documentation
Information to be included in the step documentation. You can enter several language versions.
11. Properties
The section enables step type change.
When the step type is changed into Start, the current starting step is converted into an Intermediate step, and when the starting step is changed into another type, the first step behind the one edited on the step list, its step type is changed into Start.
Selecting the Step hidden in status panel option results in the step being invisible in the information panel on the form. It can be used to hide technical steps from users in the browser.
If you select the Step is visible on diagram, the step will be visible in the workflow designer.
If you select the Edit mode available via smartphone option, you will be able to edit instances in this step on mobile devices.
If you select the OCR verification option, the instance in this step will be displayed in the form that allows you to check and possibly improve the OCR process results.
If you select the Show first attachment on page load option, as you enter an instance in this step, the page will be automatically positioned on the preview of the first attachment.
12. Step icon selector
Allows you to replace a default step icon resulting from the step type with your own one.