Print a barcode label
This action allows you to print a label with a barcode.
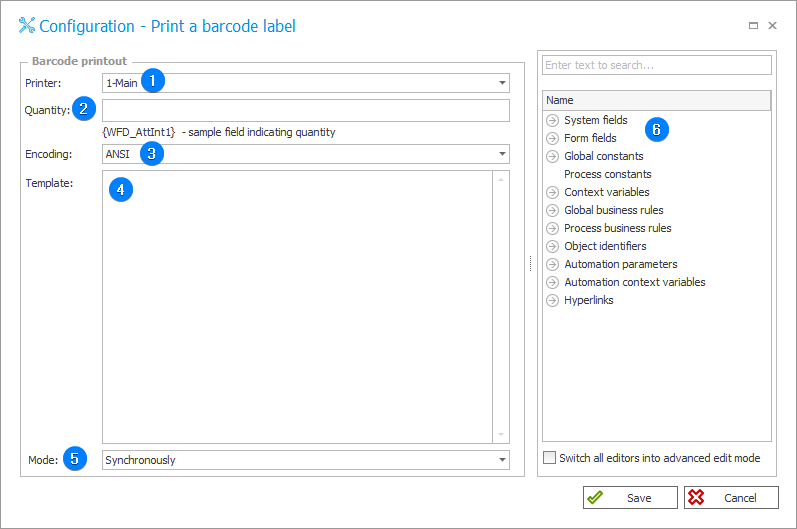
1. Printer
Type of barcode label printer:
- Main – the primary barcode printer, its name should be given in the format: \computer name\printer name,
- Accounting – alternative, second barcode printer at the registration point.
2. Quantity
The quantity of labels to be printed. It can be defined with a dynamic value.
3. Encoding
The encoding system used to create the barcode. You can choose between ANSI and UTF-8.
4. Template
Barcode label appearance template. It can be created dynamically using Variables editor.
The following table contains a breakdown of the configuration package that is sent to the printer (in a fixed manner):
| Code | Meaning |
|---|---|
| I8,B,001 | Code printing setting [8 data bits, Windows 1250 Latin 2, country code USA] |
| rY | Double buffering data |
| JF | "Top-down" printing setting |
| WY | Enabling the support of escaping Windows symbols (new line symbol "\n") |
| S1 | Setting speed to 1.5 ips (37 mm/s) |
| D14 | Setting the density/thickness to 14 (0 = invisible, 15 = darkest) |
| R24,0 | Setting the starting point to 24 points from left border and 0 from the top |
| ZB | Setting the direction of image printing from the bottom |
| UN | Disabling the error rapports błędach |
| q448 | Setting width to 448 points |
| Q468,21 | Setting length to 468 points, space between the labels |
| N | Clearing the image buffer |
Treść etykiety:
A30,10,0,1,1,1,N,"Author: John Smith
A30,36,0,1,1,1,N,"Data: YYYY-MM-DD"
Table below presents explanations of the commands:
| Code | Meaning |
|---|---|
| 30 | Number expressed in points from the left border |
| 10 | The distance ("Y") from the upper margin. For each new line, a letter height value (1 = 12 points, 2 = 16, 3 = 20, 4 = 24, 5 = 48, respectively) and the distance between the lines are defined |
| 0 | Rotation by 0 degrees stopni |
| 1 | Font size (12 points) |
| 1 | Font height multiplier |
| 1 | Font width multiplier (corresponds to the width in pixels (points): 1 = 8 points, 2 = 10, 3 = 12, 4 = 14, 5 = 32, respectively) |
| N | Printing images in a normal way (they can also be reversed) |
Configuration field (label height) is used to calculate if the printed text fits a single label. In case it exceeds the label, it is moved to the next one. The distance between stickers is added here as well.
The case with new lines is similar. A word is moved to a new line if the letter width sum is greater than the calculated value – 400 points from the left to the right margin by default.
5. Mode
Here you can set Synchronous or Asynchronous barcode printing mode.
6. Variables editor
Dynamically generated tree containing all variables that may be used in the current location of Designer Studio. Information on how to use variables in WEBCON BPS, as well as a list of variables can be found here.
Additional information on the action and its use is available on our technical blog in the articles: