Home page
Portal is the primary workspace for users of WEBCON BPS. Here, they can view the status of their tasks, access applications and statistical data, fill out forms and attach files, start workflow instances, and configure how data will be presented.
Applications and forms are viewed in the central area of the Portal interface, while the area on the left is known as the navigation menu. This menu will change depending on context – it will be different in the main Portal page, and for each individual application page.
Additionally, the user profile provides extra functionalities and allows for customization of the Portal's settings and appearance based on personal preferences.
Logging in
After entering the Portal URL configured during system installation in the browser window, you will be directed to the login page shown below.
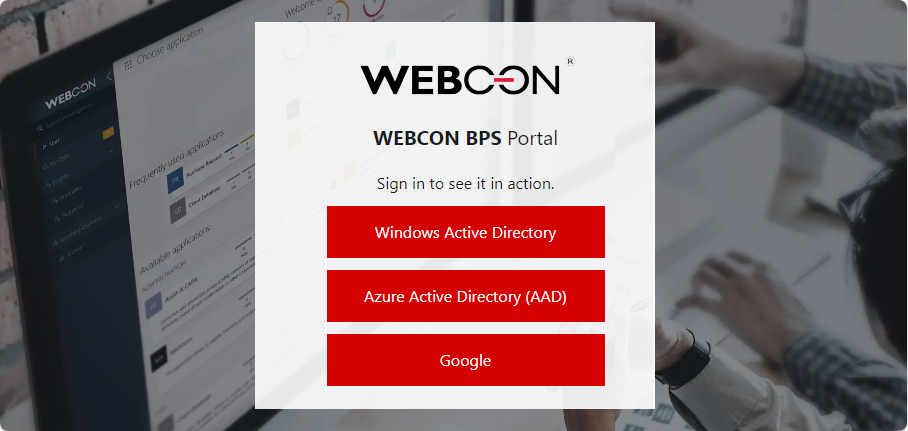
where you can choose one of the available login methods:
- Windows Active Directory – login using credentials from the local Windows environment,
- Azure Active Directory (AAD) – login via an account in the integrated Microsoft Azure service,
- ADFS – login via single sign-on credentials on a system with both a local AD environment and external applications or cloud resources,
- Google – login via third-party identity providers using the OpenID Connect protocol, such as Google.
The appearance of the login page varies depending on the license type and providers configured in WEBCON BPS Designer Studio for authentication operations in Portal. The login page and windows are displayed in the language selected in the browser settings.
For example, if you choose to log in through Windows Active Directory, a window will appear:

Enter your domain username and password.
If you have a Single-Use Access License, then, after confirming your identity externally with the chosen authentication provider, you will be directed to the selection page for the applications you are assigned tasks, instead of the login page.
Main area
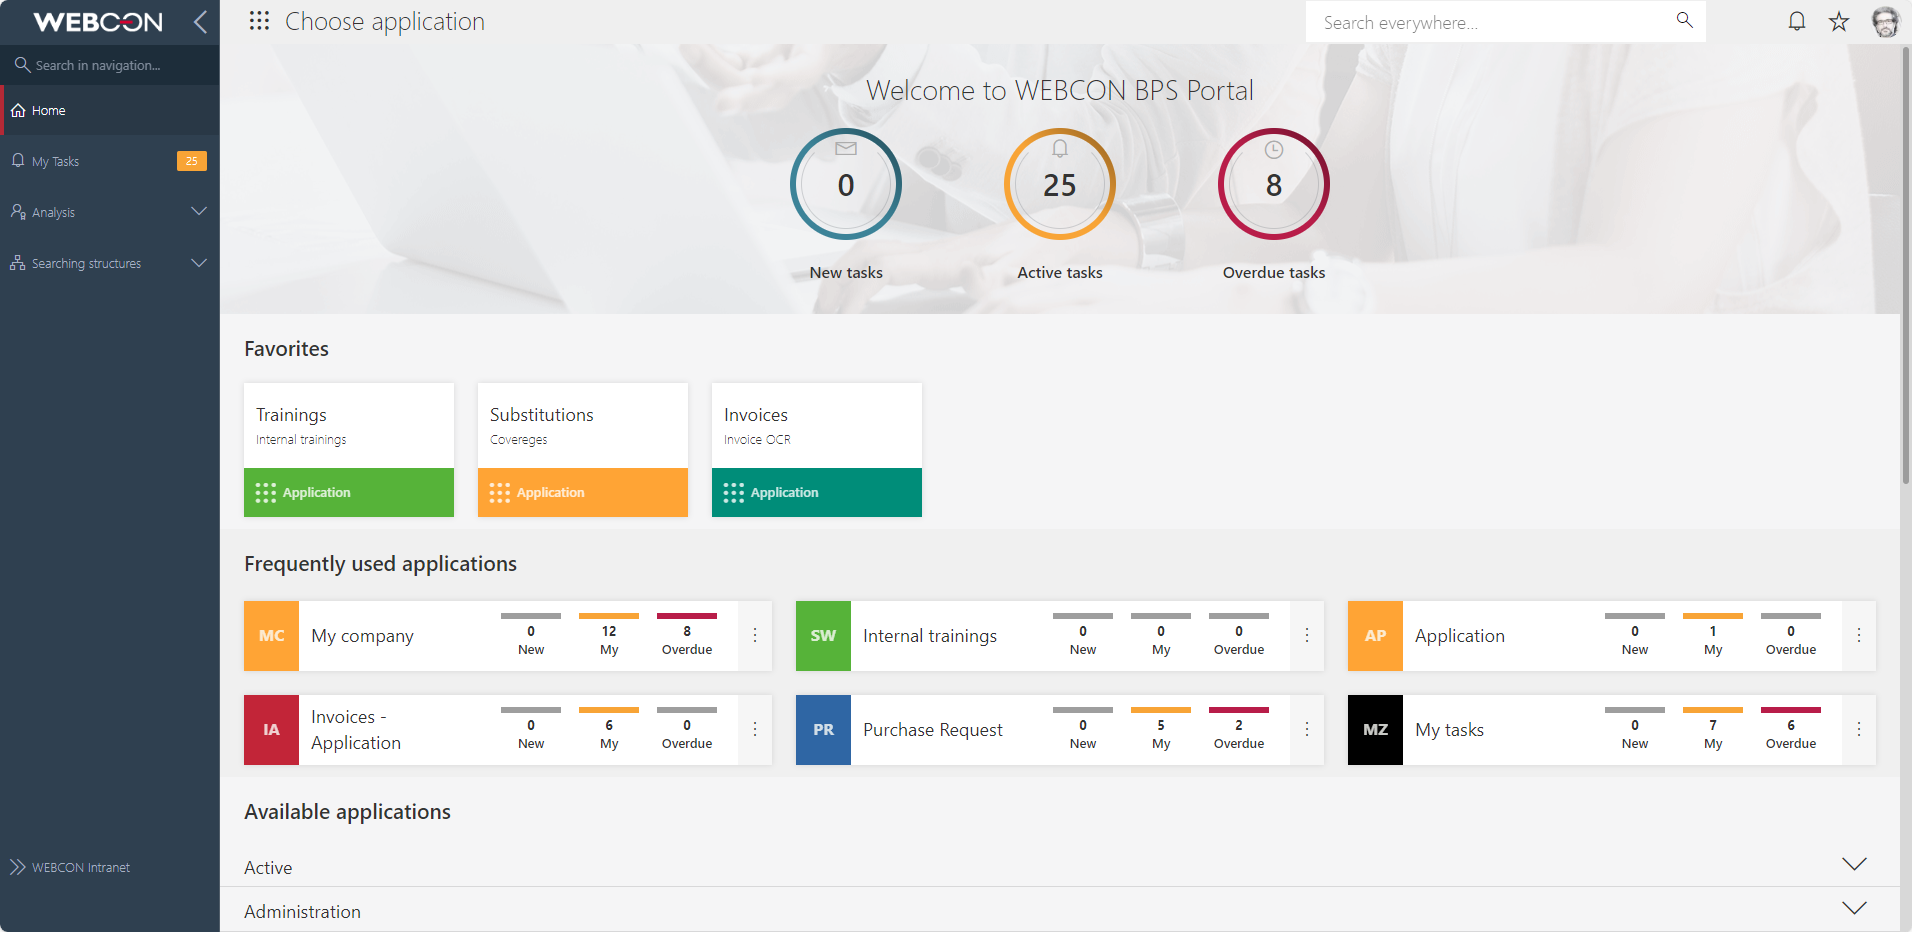
After successfully logging in to Portal, you will be directed to its home page. Here you will have a general overview of the most crucial features, assigned tasks, frequently used and available applications, as well as a list of favorite Portal elements (if any).
If you ever need to return to this main page, a quick way to do so is through the Home button in the Choose application menu, or by clicking the logo above the navigation menu (this logo is changed through Portal’s themes).
Task counters
This section provides information on the number of tasks assigned to a user. Tasks can originate from any WEBCON BPS system application.
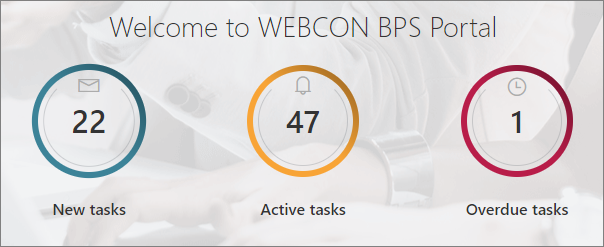
Tasks are displayed by group:
- New tasks – tasks assigned to the user that have not yet been displayed,
- Active tasks – all tasks assigned to the user that have not yet been completed,
- Overdue tasks – tasks assigned to the user that have exceeded their due date.
Clicking on a counter will display the list of tasks along with the assigned filter. For example, after selecting the active task counter, you will see a list of tasks that have not yet been completed.
Frequently used applications
Application is a visualization layer that groups related processes. The application page contains start buttons, reports, and dashboards. Access to the application requires defining privileges for users, regardless of process and data (task) privileges.
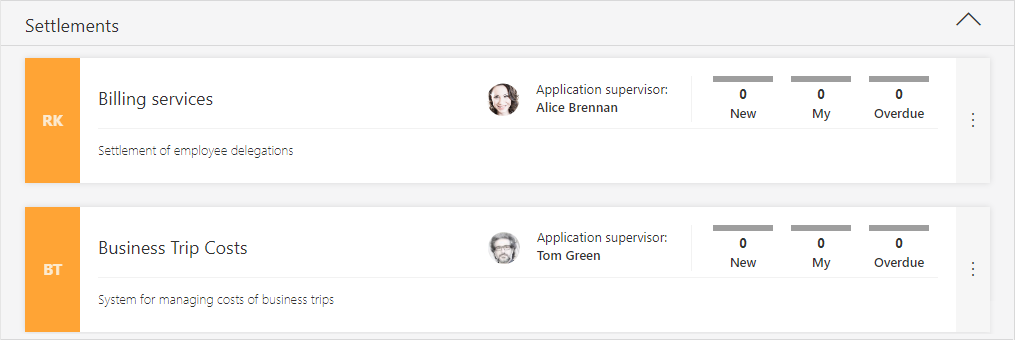
This section displays a list of your most frequently used applications. The applications are presented as tiles that show the full and abbreviated name of the application, as well as the counters of your assigned tasks (New, My, Overdue). An additional context menu is available for each application tile and can be accessed by clicking on the icon with three dots.

This menu allows you to navigate to the application home, start a new workflow instance, and view detailed information about the selected application:
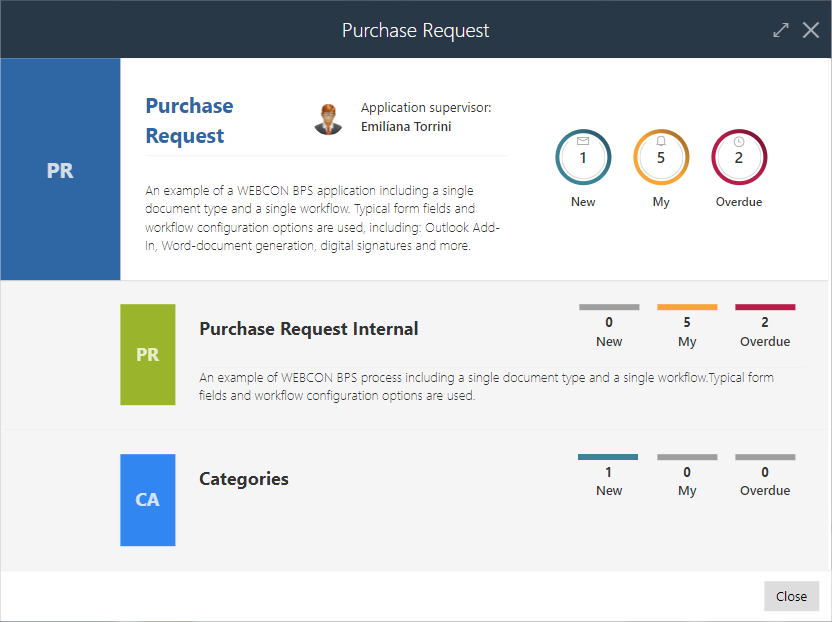
The detailed view of an application also includes its description, supervisor's name, and all processes that comprise the application. The processes are listed in order of frequency of use, with a breakdown of associated tasks.
Available applications
This section shows all the applications that you have access to within your organization. The applications are presented by group, in alphabetical order.
Clicking on the icon ![]() expands the list of applications in a given group. Each application takes the form of a tile that includes its details (as in frequently used applications).
expands the list of applications in a given group. Each application takes the form of a tile that includes its details (as in frequently used applications).
Favorites
To facilitate working with multiple applications, each user can create and manage their own list of favorite objects. This section displays the user's favorite applications, reports, dashboards, forms, and more. These objects are added using the options available in the top menu and displayed as tiles in the order in which they were added.
Navigation menu
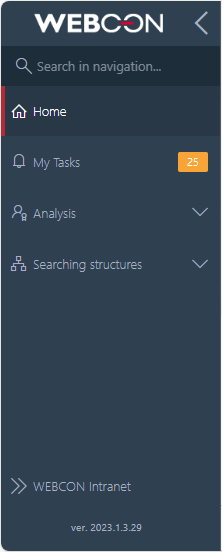
The panel on the left side of the screen enables you to search for elements in the navigation, view the list of your tasks, stating their total number, and quickly access additional Portal functionalities such as data analysis and searching structures.
The appearance of the side panel may vary depending on your license and privileges. It is worth noting that its expanded version is available on the application page.
In addition, the bottom of the panel displays information about the current version of WEBCON BPS Portal.
You can hide the side panel at any time by clicking on the icon ![]() to the right of the logo. To make the panel visible again, select the icon
to the right of the logo. To make the panel visible again, select the icon ![]() .
.
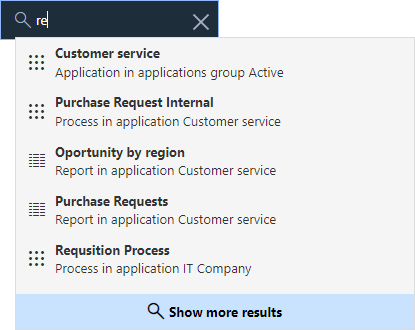
Search in navigation
The search engine enables you to search for elements, such as applications, processes, reports, dashboards, and start points by name. The suggested results depend on where the user is in Portal – on the home page, they apply to all elements available in the system, while on the application page, they are limited to that one application. Access to view an element is granted based on the user's privileges.
Top menu
The top menu bar is an area primarily used for searching data and metadata, displaying notifications, changing user profile settings, and handling diagnostic events.
![]()
Choosing an application
The button labeled Choose application is located on the left side of the top menu. Clicking on it will reveal a drop-down list of Most used applications. This is a list of all the applications you use, displayed in order from most to least used.
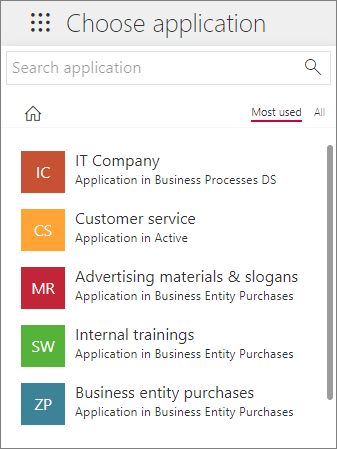
The application selection window also includes an All tab that displays all applications available in the organization. However, to use a selected application, you must have the appropriate privileges. The list of applications is displayed by Groups and in alphabetical order.
Here you can also search for applications by name, typing it into the Search application field. In this case, the Search tab will appear in the window. Clicking on the icon ![]() closes the list and returns you to Portal home page.
closes the list and returns you to Portal home page.
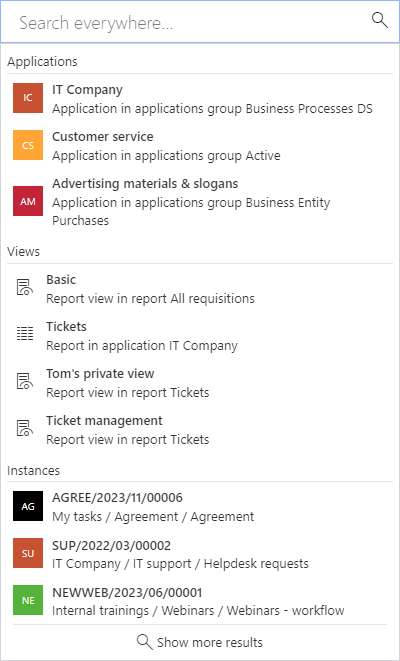
Search everywhere
This search engine allows you to find comprehensive information about the work in Portal. Clicking on this field displays a list of suggested items based on your activity in WEBCON BPS.
The search results encompass not only applications, processes, reports, and dashboards, but also workflows, views, workflow instances, steps, and other relevant areas where the search phrase appears and to which you have access.
Notably, the search can be performed based on the content of documents and attached files, as well as their authors or contributors, without the need to specify exact identification such as instance numbers.
Advanced search options
If the searched item is not returned in the results, you can use advanced search options. To access this feature, select the Show more results button located at the bottom of the search list.

This will launch the full WEBCON BPS Portal search engine that will automatically display a paged list of all elements containing the given phrase.
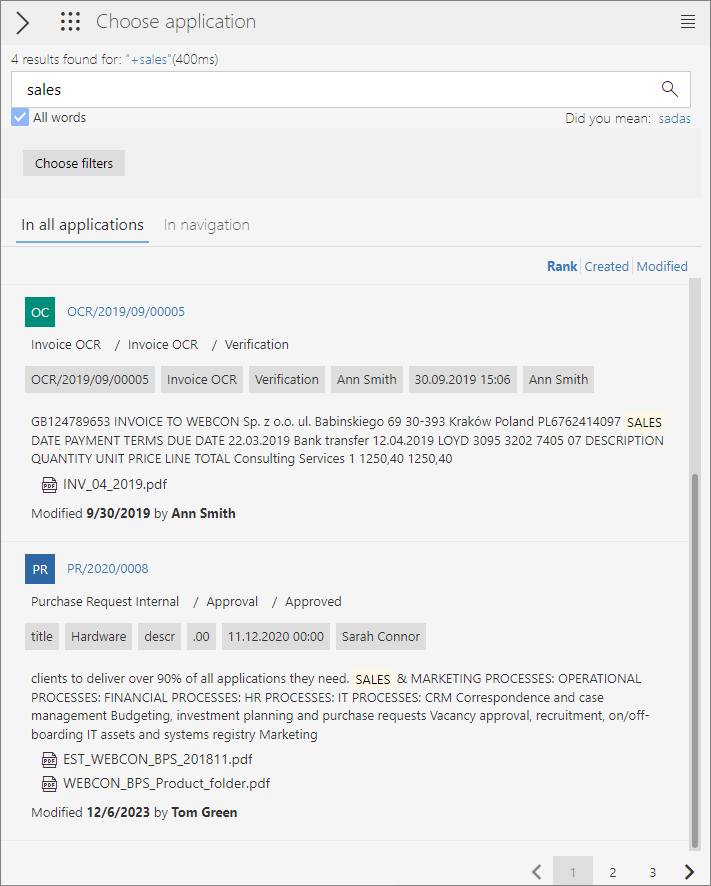
To refine your search, choose the relevant tab:
- In all applications – the phrase is searched for in elements of all available applications (default tab),
- In navigation – displays results from the Portal's navigation, taking into account the names of applications, processes, reports, dashboards, and starting points. The search is analogous to the use of the Search in navigation field.
Search results can be sorted by rank, creation date or modification date.
Also, filters are available on the left side of the search engine to limit the number of results displayed. Clicking on a filter value applies it automatically.

In turn, to disable all filtering options, select the Clear filters button. You can delete individual filters by clicking the red X next to the filter name and its value.

You can read more about searching for elements in Portal in THIS ARTICLE on our technical blog.
Language settings
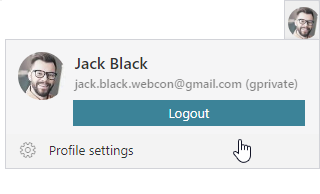
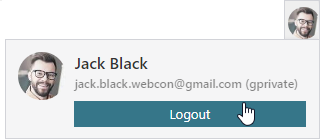
Upon clicking on the profile picture, a menu appears displaying the currently logged-in user's name, domain name, and the chosen authentication method used to log in to Portal.
From here, you can change your profile settings and access various functionalities of the WEBCON BPS platform. The available options will depend on the user's privileges.
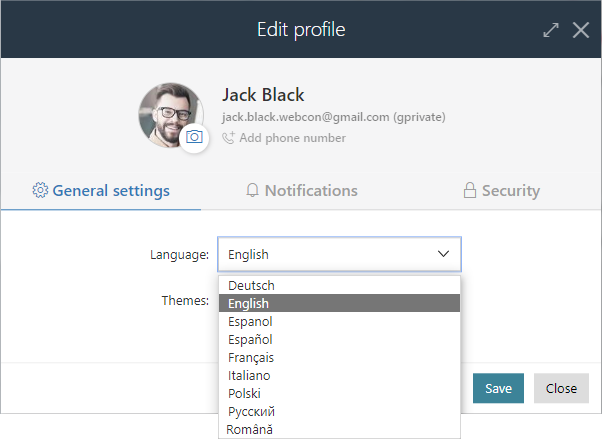
To change the Portal language, select Profile settings in the user menu. Then, in the Edit profile window, choose your preferred language from the drop-down list and save your changes.
Click HERE for more information on profile settings.
Notifications
The bell icon indicates the availability of your new tasks in the system and the number of these tasks.
![]() – no notifications,
– no notifications,
![]() – three new notifications / tasks are awaiting your attention.
– three new notifications / tasks are awaiting your attention.
When you click on the icon, a list of your tasks is displayed.
Add to favorites
After clicking on the star icon in the top menu, the system displays a list of your favorite elements. The list corresponds to the elements presented in the Favorites section of the Portal's home page, which is automatically updated after changes are made.
To add an element to favorites, click the dedicated button at the end of the list and specify the name under which the element will be saved.

You can edit your favorite elements by changing their name and display order in the list. Access the edit menu by clicking on the three dots icon located next to the element name.
Accessibility settings
If the Accessibility button box is checked in the Appearance tab of System settings in Designer Studio , the icon ![]() will appear in the top menu on the right. Clicking on this icon will open the Accessibility settings window:
will appear in the top menu on the right. Clicking on this icon will open the Accessibility settings window:
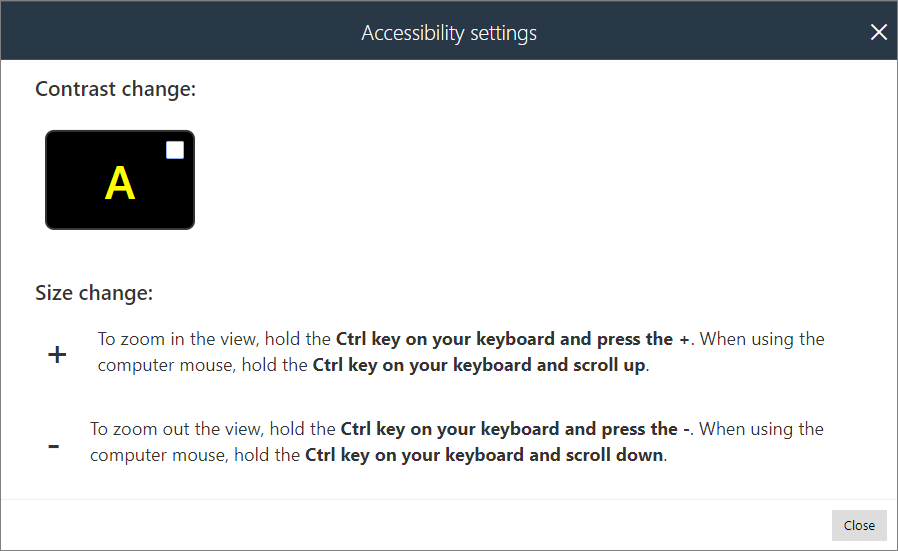
With it, you can easily change the Portal's theme to WEBCON Contrast Black Yellow or any other predefined theme with the Is contrast box checked. In addition, prompts are available for users to adjust the screen size using either the mouse or keyboard. The prompts may vary depending on the operating system used.
For more information on the digital accessibility of Portal, see THIS ARTICLE on our technical blog.
The top menu takes a more elaborate form on the application page. A detailed description of additional options can be found HERE.
Diagnostics
Selecting Enable diagnostics from the user menu will display an additional icon in the top menu: ![]() .
.
Click HERE for more information of Diagnostics.
Logging out
Once you have completed your work and saved all changes, you can log out of Portal by selecting either Logout or Global logout in the user menu.
Close the browser window to make sure you are completely logged out.
See THIS CHAPTER for more logout options.