Change requests
The functionality allows end users of WEBCON BPS applications to provide feedback to application creators. These comments or remarks can serve as a basis for implementing enhancements and developing the respective application.
Enabling the functionality
The functionality is disabled by default and must be enabled either in Designer Studio or the Change requests node in the Portal's Admin panel.
Please note that while enabling the functionality in Designer Studio requires System administrator privileges, the same operation in Portal can also be performed by an Application administrator or Application supervisor
Standard handling vs. Custom handling
The change request functionality can operate in one of the two available modes defined in Designer Studio or Admin panel: standard handling (Active – standard handling) and custom handling (Active – custom handling). Given that selecting the latter mode results in redirecting to an external online form provided in the settings, the description below applies exclusively to standard handling.
Accessing the functionality in Portal
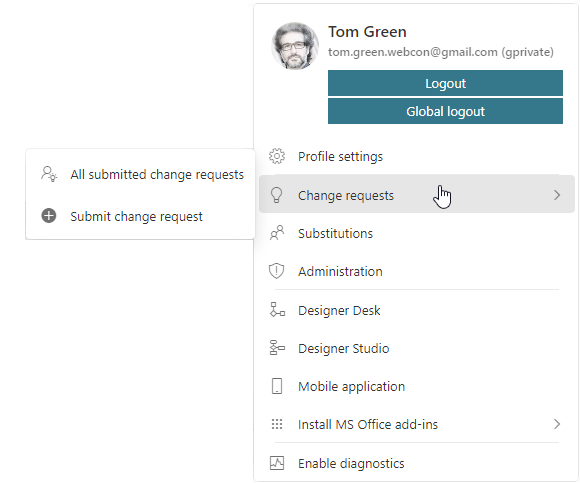
To use the functionality, go to Portal, open the user menu, and select the Change requests node. The options available under this node depend on the currently displayed page (for the main Portal page, the option is All submitted change requests, and for the application page: All submitted change requests and Submit change request).
The functionality can be used by anyone with access to a particular application. However, please note that it is not available for individuals working on behalf of a substituted person.
All submitted change requests
The page contains information on all submitted change requests. These requests are presented in the form of a list, with its content depending on the location from which it was accessed. This means that the list accessed from the Portal home page contains change requests that apply to all applications to which a user has access, while the list opened from the application page includes only the change requests associated with that specific application.
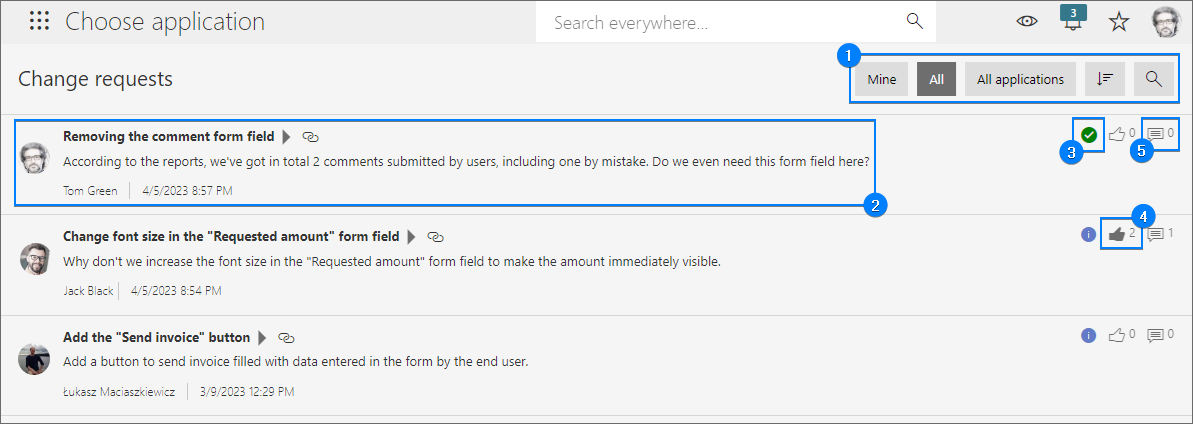
1. Filtering, sorting, and search buttons
The buttons in the top right corner allow you to manage the requests presented on the list. The buttons Mine, All, and All applications enable convenient filtering, i.e. limiting or expanding the range of requests displayed.
Depending on where the list was opened from, the system applies either the All applications filter (if accessed from the Portal home page) or a filter that restricts requests to a specific application (if accessed from the application page). The filter can be changed by clicking its button and selecting or removing an application.
You can also sort requests using the button ![]() . Clicking it opens a menu that offers the following options: Modification date, Creation date, Status, Popularity, Sort ascending, and Sort descending.
. Clicking it opens a menu that offers the following options: Modification date, Creation date, Status, Popularity, Sort ascending, and Sort descending.
In addition to the filtering and sorting buttons mentioned earlier, you can also search for specific requests. This is enabled by the magnifying glass button (![]() ) which opens the search panel on the right side of the window.
) which opens the search panel on the right side of the window.

2. Change request
The individual rows of the list display change requests along with their names and content.
The user sees only those requests on the list for which they are authorized. This requires having access to the application associated with a given request. Furthermore, a request for which the Change request visible to all checkbox has not been selected by its author or administrator will only be visible to the author and administrator.
Clicking the request name opens its window on the All submitted change requests page. You can also open this window in a separate page using the button ![]() located next to the name.
located next to the name.
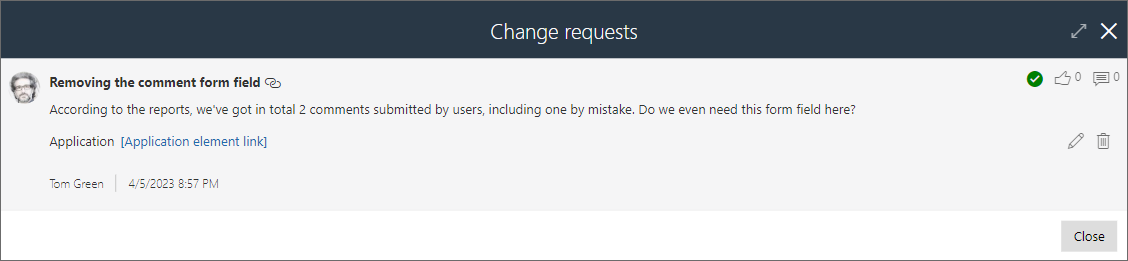
Whether the request window is displayed in the context of the All submitted change requests page or as a separate page, its content remains the same. The window contains comprehensive information about the request, including its name, content, modification date, a link redirecting to the associated element, and any comments. In addition, if the request status is Pending, you can add your own comment using the Add a comment button located below the request content (or any existing comments). The Pending status allows the request author to edit and remove it (the administrator can remove the request regardless of its status).
The top right corner of the window provides status, like (an author cannot like their own request), and comment buttons which operate similarly to those available at the All submitted change requests list level.
A user can also copy a link to a specific change request using the button ![]() . The copied link redirects to the request page and can be opened by an authorized user.
. The copied link redirects to the request page and can be opened by an authorized user.
Registering requests
The change request functionality offers you the ability to quickly register related implementation requests. Registering such a request constitutes the first step to implementing a solution suggested in the change request.
An implementation request can only be registered by a properly authorized person (System administrator, Application administrator, or Application supervisor). This can be done by clicking the Register external request button in the change request window. (The button is visible if the Allow registering external requests checkbox is selected and the proper configuration is input in Designer Studio or the Admin panel.) Depending on the defined settings, clicking the aforementioned button initiates a dedicated workflow in WEBCON BPS or opens an external online form.

3. Change request status
The button displays the change request status which can be updated by a properly authorized user (either the author or an administrator).

Change request and comment authors can edit and remove their own entries only if the request's status is Pending. Once the status changes, only an administrator can remove the request.
4. Likes
Clicking the like button allows you to express your support for an idea presented in the change request. You can add likes to suggestions that appear in the list of All submitted change requests. Clicking the button again removes the like.
5. Comments
The button allows you to add a comment to a change request. Every user, including the change request author, can add a comment. After adding a comment, the number next to the button updates to reflect the total number of comments.
A comment can be modified (edited or deleted) by its author while the change request is in Pending status. Once the status changes, only the administrator can delete the comment.
Submitting a change request
The Submit change request button allows you to register a change request for the currently displayed Portal element. The button is visible in the user menu, provided the menu is not accessed from the Portal home page (submitting change requests from the Portal's home page is not possible). When you press the button, a window opens where you can create and configure a request.
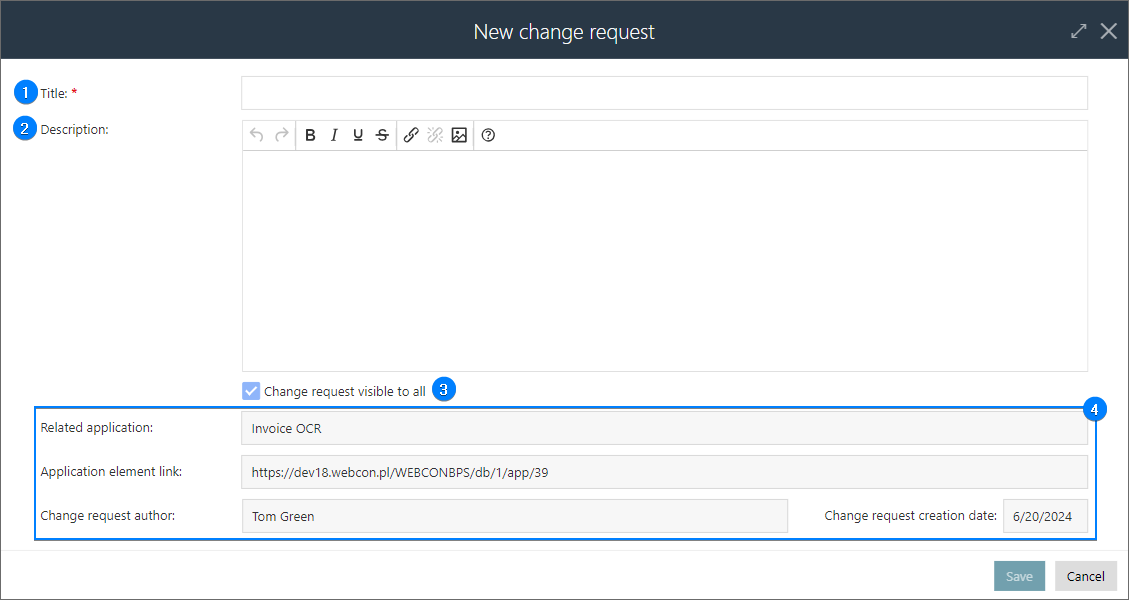
The change request edit window contains several fields, but only three of them are editable.
1. Title
The field should contain a name that suggests the proposed modification. This field is required to submit a change request.
2. Description
The field allows users to enter a detailed description of the suggested modification and add an image. Additionally, you can apply styling to the text (bold, italics, underline, strikethrough) and include hyperlinks.
3. Change request visible to all
Selecting the Change request visible to all checkbox makes the change request visible to all end users of the WEBCON BPS application (the checkbox is selected by default). Unchecking it restricts visibility to the author and the administrator.
4. Non-editable fields
The fields include information about a change request, such as the name of the application to which the request applies (Related application), a copyable link to its specific element (Application element link), and details about its author (Change request author) and date of creation (Change request creation date).
Once you add a change request (by pressing the Save button), it will appear in the All submitted change requests section where it can be liked or commented on by users of the respective application.
To learn more about change requests, read the ARTICLE available on the WEBCON Community page.