Automations
To access automations, select relevant workflow from the available tree and click the Global actions tab in the newly opened window. In the Actions list field, select the item under which an automation will be run and click the plus button on the right. A configurable automation is created with its icon displayed in the Actions list field.
The automation window includes two tabs: General and Error handling:
General
The tab from which automations are added and configured.
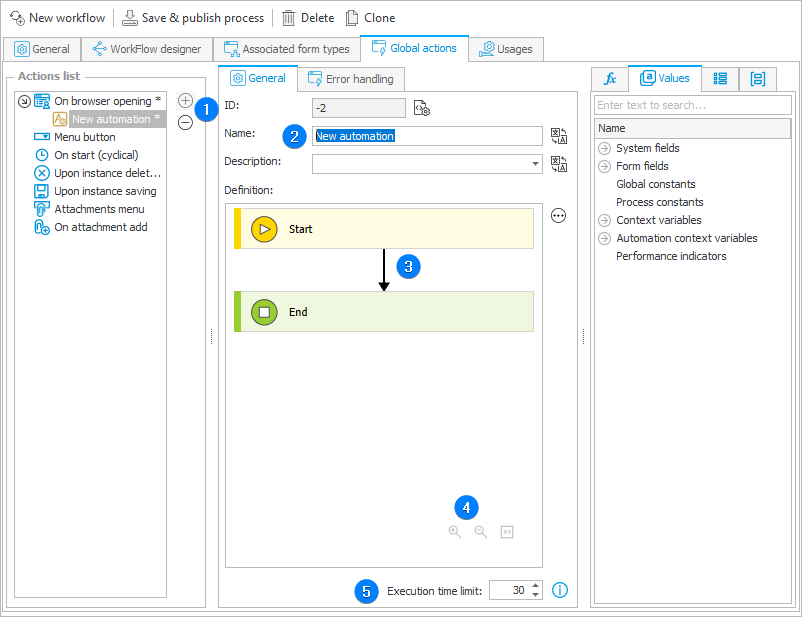
1. Add/Delete
Adding and deleting automations under the selected triggering type. For the Menu button and On start (cyclical) triggers, there are additional icons created: New button and New cycle, respectively. Clicking the plus button with the Attachments menu item selected results in adding an action.
The menu button that activates the configured automation is typically visible in both edit and read-only modes of the form. An exception arises when the automation includes only the Hyperlink action. In such cases, if a menu-button automation is created under the Global actions tab, containing another automation with the Hyperlink action, the mentioned button is visible only in the edit mode. Conversely, when the Hyperlink action is directly inserted into the menu-button automation, the button is visible in both modes.
2. Basic parameters
The fields allow you to identify automation. The ID field is uneditable, while the Name field is required and cannot be left empty. The Documentation field is optional – here you can enter a description of an automation for an additional explanation of its functions.
If the automation is marked as Active, it will be executed in its entirety, which will be confirmed by a corresponding entry in the instance History in Portal. Deselecting this option will disable automation.
It is also possible to deactivate individual actions within the automation, as well as entire blocks of actions defined within the SWITCH, For each, and Condition operators. To do this, click on the selected three-dot icon and select Deactivate (Ctrl+D) from the context menu. Similarly, you can reactivate an action / a group of actions by choosing Activate (Ctrl+A).
3. Automation definition area
The definition field consists of uneditable Start and End blocks connected with an arrow.
To add actions executed under an automation, move the cursor over the arrow. A plus icon appears – click it to open the action selection window.

The action selection window has four tabs:
Operators
The tab includes the following operators:
-
Condition – controls the automation workflow in the same way as the workflow control step. Each condition block includes a Boolean rule directing the automation to one of the two paths. It is possible to embed a bigger number of condition blocks to get more branches. Two new operators are available in the block: End and Break with error which allow you to conclude automation earlier. The latter simulates an error. All the events created within the automation are undone, and the automation is run in the Error handling tab.
-
For each – allows you to configure an action, operation, or automation for each element from the provided collection. The operator can iterate elements from a collection that can be an item list, any data source, a list of attachments added to a workflow element, and any business rule collection.
infoMore information on the For each operator and its configuration is available in the ARTICLE on our technical blog.
-
SWITCH – allows for handling more outcomes and conditions compared to the Condition operator.
The condition within the SWITCH operator is a business rule that determines the case to be used. The case can be designated in two ways:-
Variable referencing the case
As with the Workflow control step, the result of the rule can be a variable that references one of the available cases. If the rule does not identify any case, the ELSE case will be used.
-
Value assigned to case
Each case may be associated with a value. The result of the condition will be compared with these values (from left to right). If a match is found, the matching case will be used. If the result does not match any case, the ELSE case will be used.
-
Any number of cases may be created, their names and order may be changed. The ELSE case is always at the end. The operator must have at least 2 cases (including the ELSE case).
The SWITCH operator may be changed to the Vertical layout from the context menu.
Action
The tab includes a set of actions that can be used in the automation. The actions are executed top-to-bottom until the automation encounters the End or Break with error block. The set of actions available in the automation depends on the type of trigger selected in the Action list field. A list of all actions is available here.
Action templates
The tab includes user-created action templates.
Automations
Model automations created within the process that can be embedded in automations under action triggers.
Note that the content of each of the above-mentioned tabs depends on the type of trigger under which the automation is created.
Clicking one of the items creates an action block with a vertical ellipsis icon. Clicking this icon opens a menu with further edition options.
Automation can also be defined in a separate edition window opened with the Edit button on the right side of the automation definition area (ellipsis icon). It includes two tabs: General and Error handling and a rule editor on the right. In the left lower corner there is also a Create process automation button. It can be used to save the created automation and use it in many other locations.
If Global automation has been defined in System settings, it will also be available for selection here.

4. Diagram size controllers
Used to increase and decrease the diagram or to restore its default size.
5. Execution time limit
The parameter allows you to determine the automation execution time (expressed in seconds). When the time is exceeded, the automation is stopped and an error "Execution time exceeded" is displayed. Counting the automation time begins with the commencement of its execution and is checked before entering each automation block (action block or process automation block).
For automations run for On timer and Cyclical events, the time is additionally controlled by the parameter Services operations timeout in seconds set in System settings in the Services window.
If execution time exceeds the time configured at the service level, the automation is immediately stopped. In such cases the error handling automation is not run.
Error handling in automations
Error handling is a separate automation workflow that is run when the Definition workflow fails.
What error handling is used for
Each automation contains two workflows:
- Definition — the main automation workflow,
- Error handling — a separate workflow that is run when the Definition workflow fails.
Error handling is not intended to repair the workflow instance. Its purpose is to respond to an error:
- notify a specified person,
- save error information outside the workflow,
- roll back an operation performed in an external system,
- display a clear message to the user.
When error handling is triggered
Each workflow block (action, operator, process automation) ends with one of three statuses:
- Success — the block was executed successfully.
- Validation error — the action reported that it could not perform the operation (e.g. a failed REST call, missing required data), or the Break with error operator ended the workflow with the Validation error type.
- Error — an exception occurred while the action was being executed (e.g. an SQL error), or the Break with error operator ended the workflow with the Error type.
The Error status is also returned in the following situations:
- the maximum automation execution time is exceeded,
- the automation nesting limit is exceeded (10 levels),
- an action that is not allowed at the given trigger location is used.
Any status other than Success, including Validation error, stops the Definition workflow and starts the Error handling workflow. The action determines whether a given situation is a validation error or an error.
Execution time limit
The execution time limit is checked before each subsequent block, not while an action is being executed. An action that is already running is not interrupted. The execution time limit is not checked in the Error handling workflow.
Automations run On timer and Cyclical are additionally subject to the Service operations timeout in seconds limit. Exceeding it stops the automation immediately, without running the Error handling workflow.
The dependencies between timeouts are described in the article Types of timeouts.
Break with error operator
The Break with error operator allows the Definition workflow to be deliberately ended with an error, e.g. in one of the branches of the Condition operator. The operator configuration contains the error type (Validation error or Error), a message, and an error code. The message is required and translations can be added for it.
The operator is available only in the Definition workflow.
Error handling flow
Rolling back changes
After an error occurs, the transaction is rolled back:
- changes to form field and Item list values, as well as the path transition, are not saved,
- attachments are restored to the state from before the automation was started,
- deferred actions from the Definition workflow, e.g. email messages waiting for the transaction to be committed, are not executed.
Operations performed outside the WEBCON database, such as a REST or SOAP call, a procedure in an external database, or a PowerShell script, cannot be rolled back automatically. This is what the Error handling workflow is used for.
Execution outside the transaction
The Error handling workflow is executed outside the transaction. As a result:
- actions that modify the workflow instance are not available in the Error handling workflow,
- a persistent record of the error must be saved outside the workflow instance: in an email message, by using an SQL procedure in a custom table, or by invoking a service.
Changes made to the form in the Error handling workflow cannot be saved to the workflow instance. This is because error handling is executed outside the transaction.
Execution order
Error handling is executed for all automations that were executed as part of a given operation, in the reverse order of their execution:
- for a path transition: On entry → On path → On exit,
- for automation A with nested automations B1, B2, and B3, when an error occurs in B3: B3 → B2 → B1 → A.
This rule also applies to a Branch step and subworkflows started in the same transaction. The exception is a parent instance moved from a Wait for sub-workflows step. It runs in a separate transaction, so only its error handling is executed.
Data state during error handling
Automation parameters (Input, Local variables, Output) and form field values in the Error handling workflow retain the state from the moment the Definition workflow was interrupted. This makes it possible, for example, to pass the identifier of a document created in an external system to a rollback action.
Elements available in the Error handling workflow
The following actions are available in the Error handling workflow:
- Send custom email,
- Run an SQL procedure,
- Run an SDK action,
- Run a PowerShell script,
- Invoke SOAP Web service,
- Invoke REST Web service,
- Send a PUSH notification.
Operators are also available, including Condition and Set error message. The Break with error operator is not available.
The Error handling workflow can contain process automations. In this case, their Definition workflow is executed, while actions that are not allowed in error handling are skipped and shown in the instance History as not executed.
If another error occurs in the Error handling workflow, error handling is interrupted and the user sees the message for that error.
Error message and error code
Error message
The error message is the text displayed to the user. When the automation runs without user interaction, the message is written to the log. The message consists of two parts:
- The message defined in the Error message field in the action properties — optional, translatable, and added before the system message.
- The action's system message, e.g. “An error occurred while executing the action…”.
Technical details, e.g. the SQL error message or call stack, are written only to the administrator log and instance History.
Set error message operator
The Set error message operator is available only in the Error handling workflow. It replaces the message that the user will see at the end. If another error occurs later in the Error handling workflow, the message for that error is displayed.
Error code
The error code is a number assigned by the process designer. It is not a code returned by an external system, e.g. an HTTP code or SQL error code. The error code is set:
- for an action — in the Error code field in the action properties; the default value is
100, - for the Break with error operator — in the operator configuration.
The error code makes it possible to identify in the Error handling workflow which action or type of problem caused the error. For example, the condition {AUTM:ERRORCODE} = 210 can trigger a rollback of an invoice in the ERP system. To distinguish between actions, assign them different error codes. The error code is written to the log and is not displayed to the user.
Automatic variables
Automatic variables are available in the expression editor, on the Values tab, in the Automatic variables group.
| Variable | Tag | Returned value |
|---|---|---|
| Execution code of the last block → Success | {AUTM:SUCCES} | True or False |
| Execution code of the last block → Validation error | {AUTM:VALIDERROR} | True or False |
| Execution code of the last block → Error | {AUTM:ERROR} | True or False; True also when the execution time or nesting limit is exceeded, or when a disallowed action is used |
| Execution code of the last block → Error → Execution time exceeded | {AUTM:ERRORTIME} | True or False |
| Error message | {AUTM:ERRORMSG} | Error message content (see Error message and error code) |
| Error code | {AUTM:ERRORCODE} | Error code (see Error message and error code) or an empty value |
| Execution time of the last automation element | {AUTM:PREVOPERATIONDURATION} | Execution time of the last block in milliseconds |
| Automation duration | {AUTM:TOTALDURATION} | Time elapsed since the automation started, in milliseconds |
The values of automatic variables are subject to the following rules:
- The variables describe the last executed block, not the entire automation. Therefore, in the first block of the Error handling workflow, they describe the block that caused the error.
- The variables are updated after each block, including in the Error handling workflow. After a block is executed successfully (e.g. the Set error message operator or sending an email message), the Success variable is set to
True, while the error message and error code are empty. - The
TrueandFalsevalues can be used directly in business rules and in the Condition operator.
Actions that use error information, e.g. sending an email message or writing to a log, should be placed at the beginning of the Error handling workflow, before other blocks.
Common scenarios
- Administrator notification — at the beginning of error handling, use the Send custom email action with
{AUTM:ERRORMSG}and{AUTM:ERRORCODE}in the message body. - Rolling back an operation in an external system — in the Definition workflow, the Invoke REST Web service action creates an invoice in the ERP system and saves its identifier in a parameter, while the next action ends with an error. In the Error handling workflow, the Condition operator checks the parameter containing the identifier, and the Invoke REST Web service action deletes the invoice.
- Persistent error log — the Run an SQL procedure action saves the workflow instance identifier, error code, and error message to a custom table.
- Clear message for the user — the Set error message operator, placed after the actions from the previous scenarios, e.g. with the message “The document could not be registered in the ERP system. Try again in a few minutes.”
- Different responses to different errors — different error codes in actions and the Condition operator checking
{AUTM:ERRORCODE}or{AUTM:VALIDERROR}. - Deliberate interruption — in the Definition workflow, the Condition operator checks the data. If they are incorrect, the Break with error operator ends the workflow with the Validation error type, a custom message, and an error code.
Diagnostics
Information about error handling execution is available in two places:
- Instance History — the automation flow is shown as a tree containing nested automations, conditions, actions, and a separate node for error handling execution. Error handling executions from all automations are shown in a single list.
- Administrator log — action details in the instance History contain the full error message, error code, and parameter values of nested automations.